A lot happens on Twitter, and the wrong notification sound may limit your ability to get real-time Twitter updates.
So, can you personalize your Twitter notification sound?
How do you switch from one Twitter notification to the next if that’s the case?
Twitter keeps its users updated each minute through the help of its notification sounds. When you sign up for a Twitter account, the notification sounds are on by default. Therefore, you’ll keep getting alerts for replies to your tweets, retweets, or DMs.
Thankfully you can use different notification sounds by simply accessing the notifications settings on your Android device. However, you cannot separately change the Twitter notification sound on newer iPhones.
You can change or customize the Twitter notification sounds. But there is more to notification sounds, how to switch these sounds and change the alerts. So, read on to get the particulars of Twitter notifications sounds.
What’s Twitter Notification Sound?
Twitter notification sounds alert you every time you have a new update on your Twitter account.
It could be a mention, a DM, a tweet reply, or a new follower. The “buzzes” and vibrations directly from Twitter are indications that you’re an active Twitter user.
Twitter’s default notification sound is quick and hard to miss. The “birdy tweet” sound is one notification sound you won’t mind getting on your phone. But you can change it.
How Do I Change Twitter Notification Sound?
You can change your notification sound via your phone’s Settings.
On Android
You can customize your Twitter notification sound on your Android phone. You can use your favorite music or tunes. It all depends on your preferences.
Follow these steps:
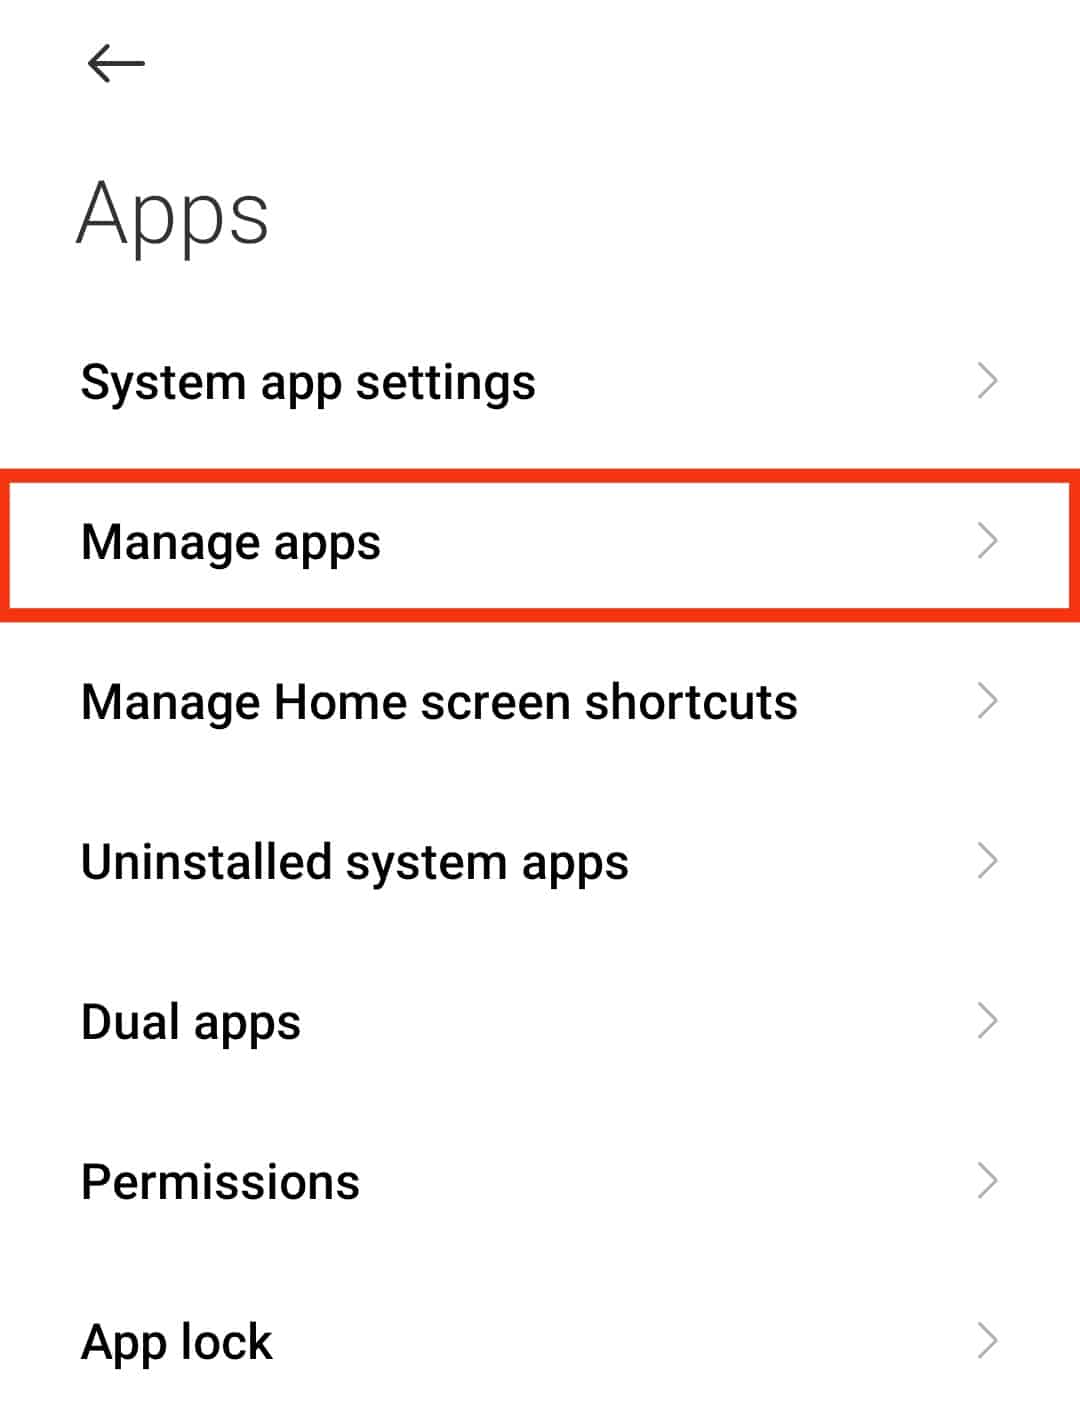
- Open the Settings app on your phone.
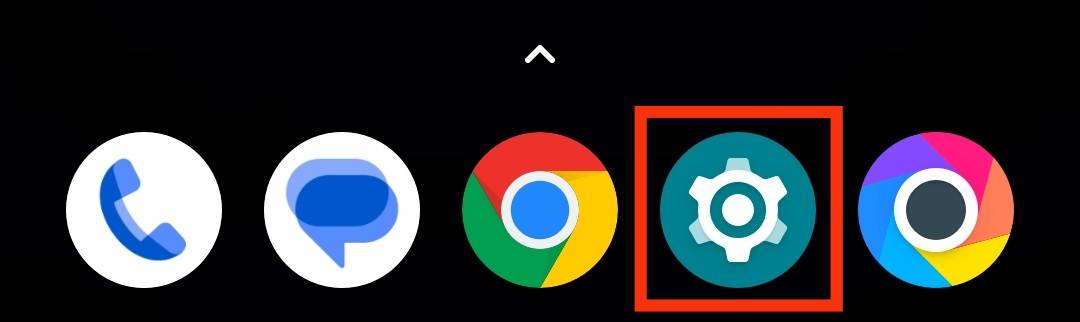
- Tap on the “Apps” option.
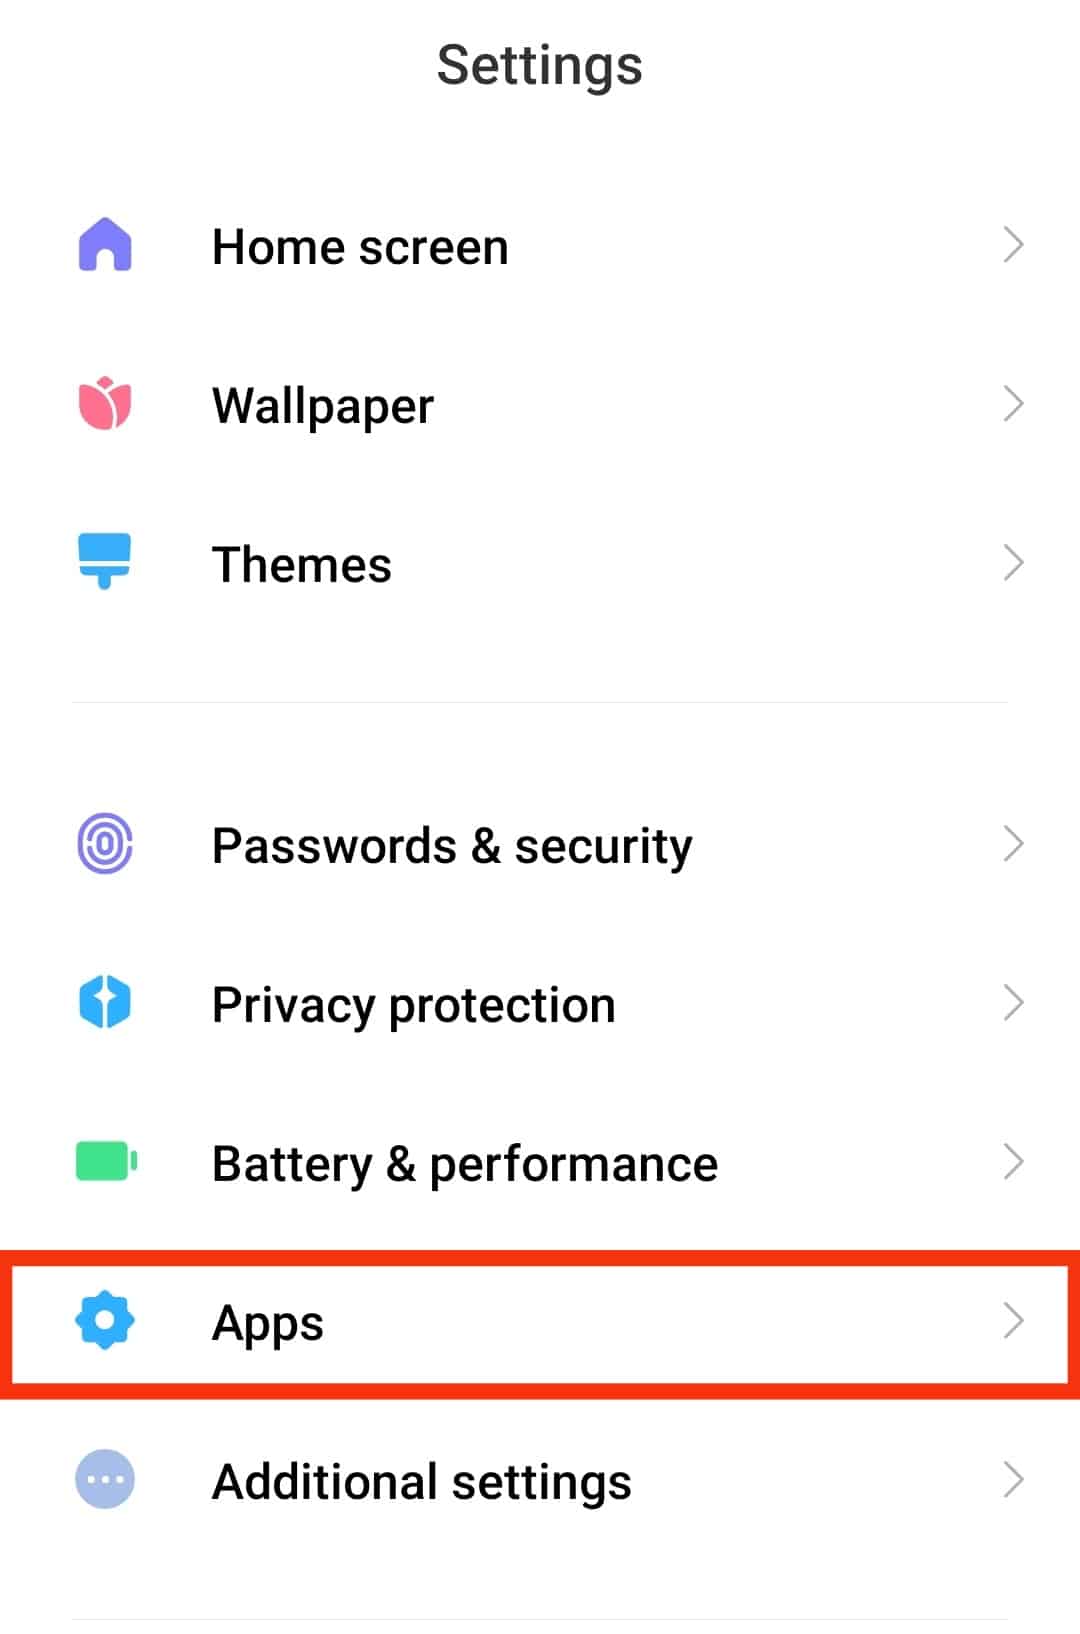
- Selects “Manage apps.”
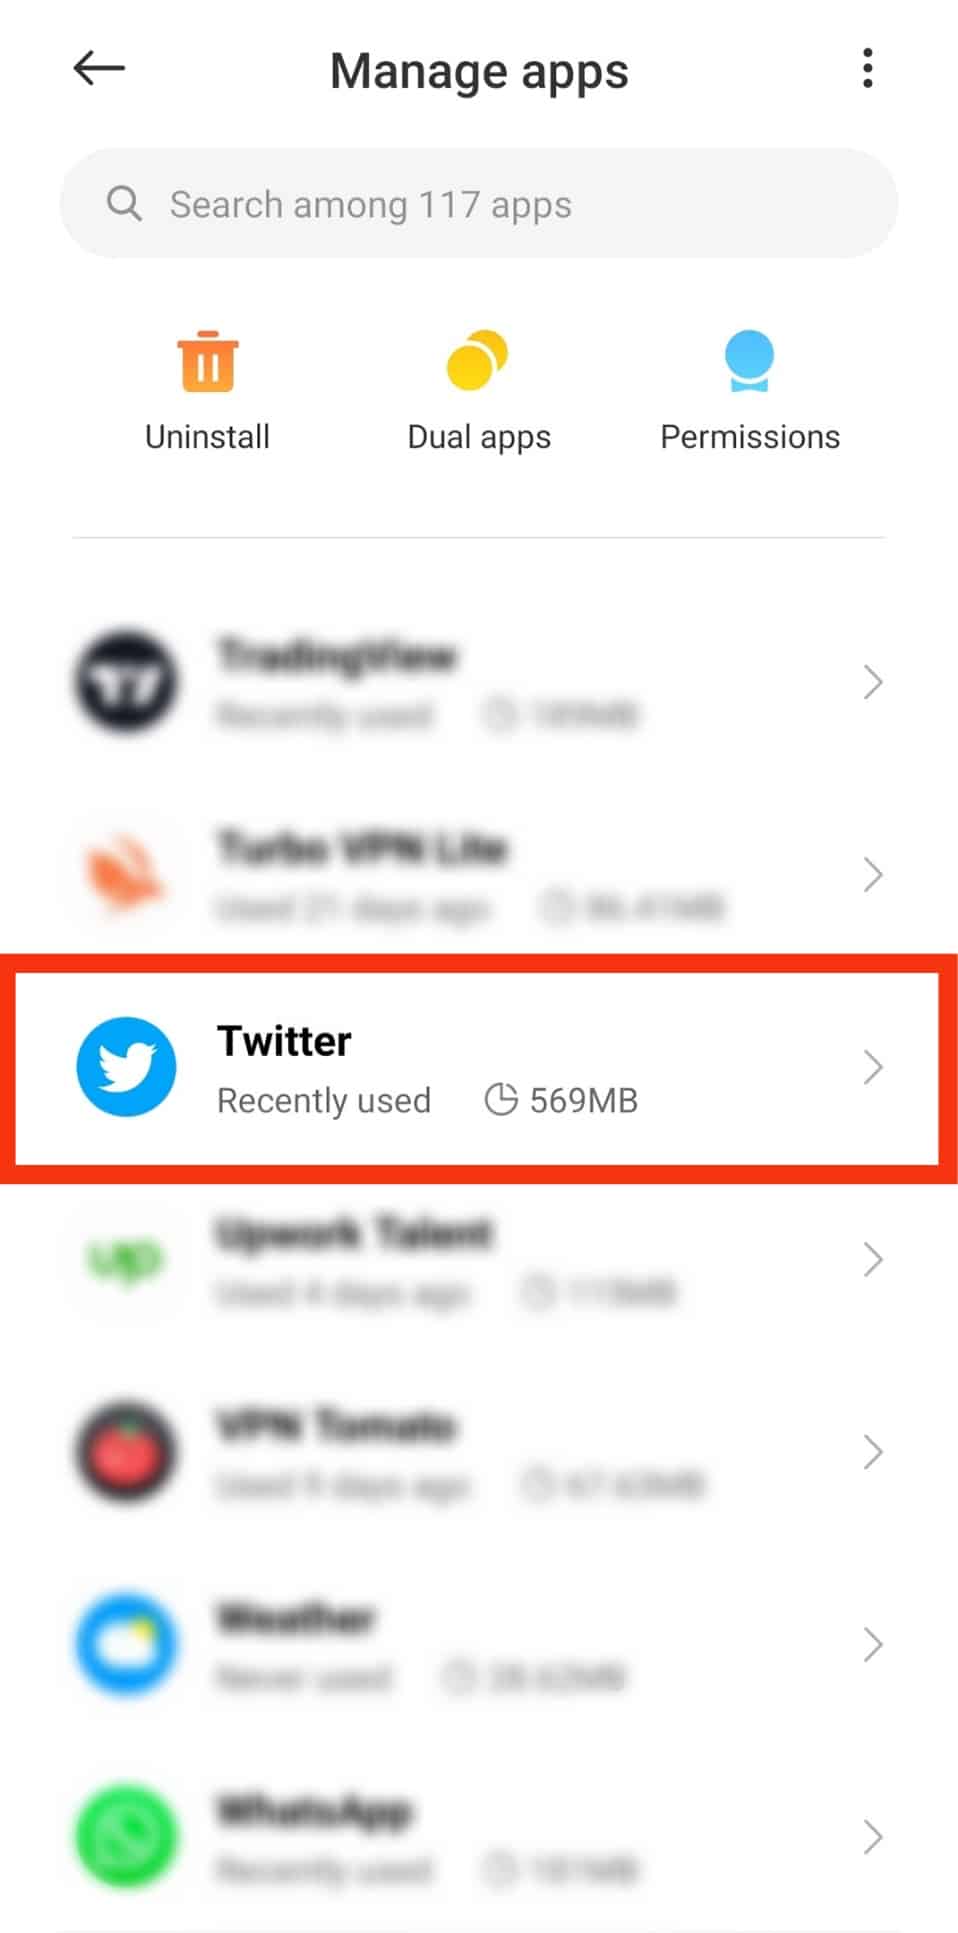
- Search or scroll down to the Twitter app and click on it.
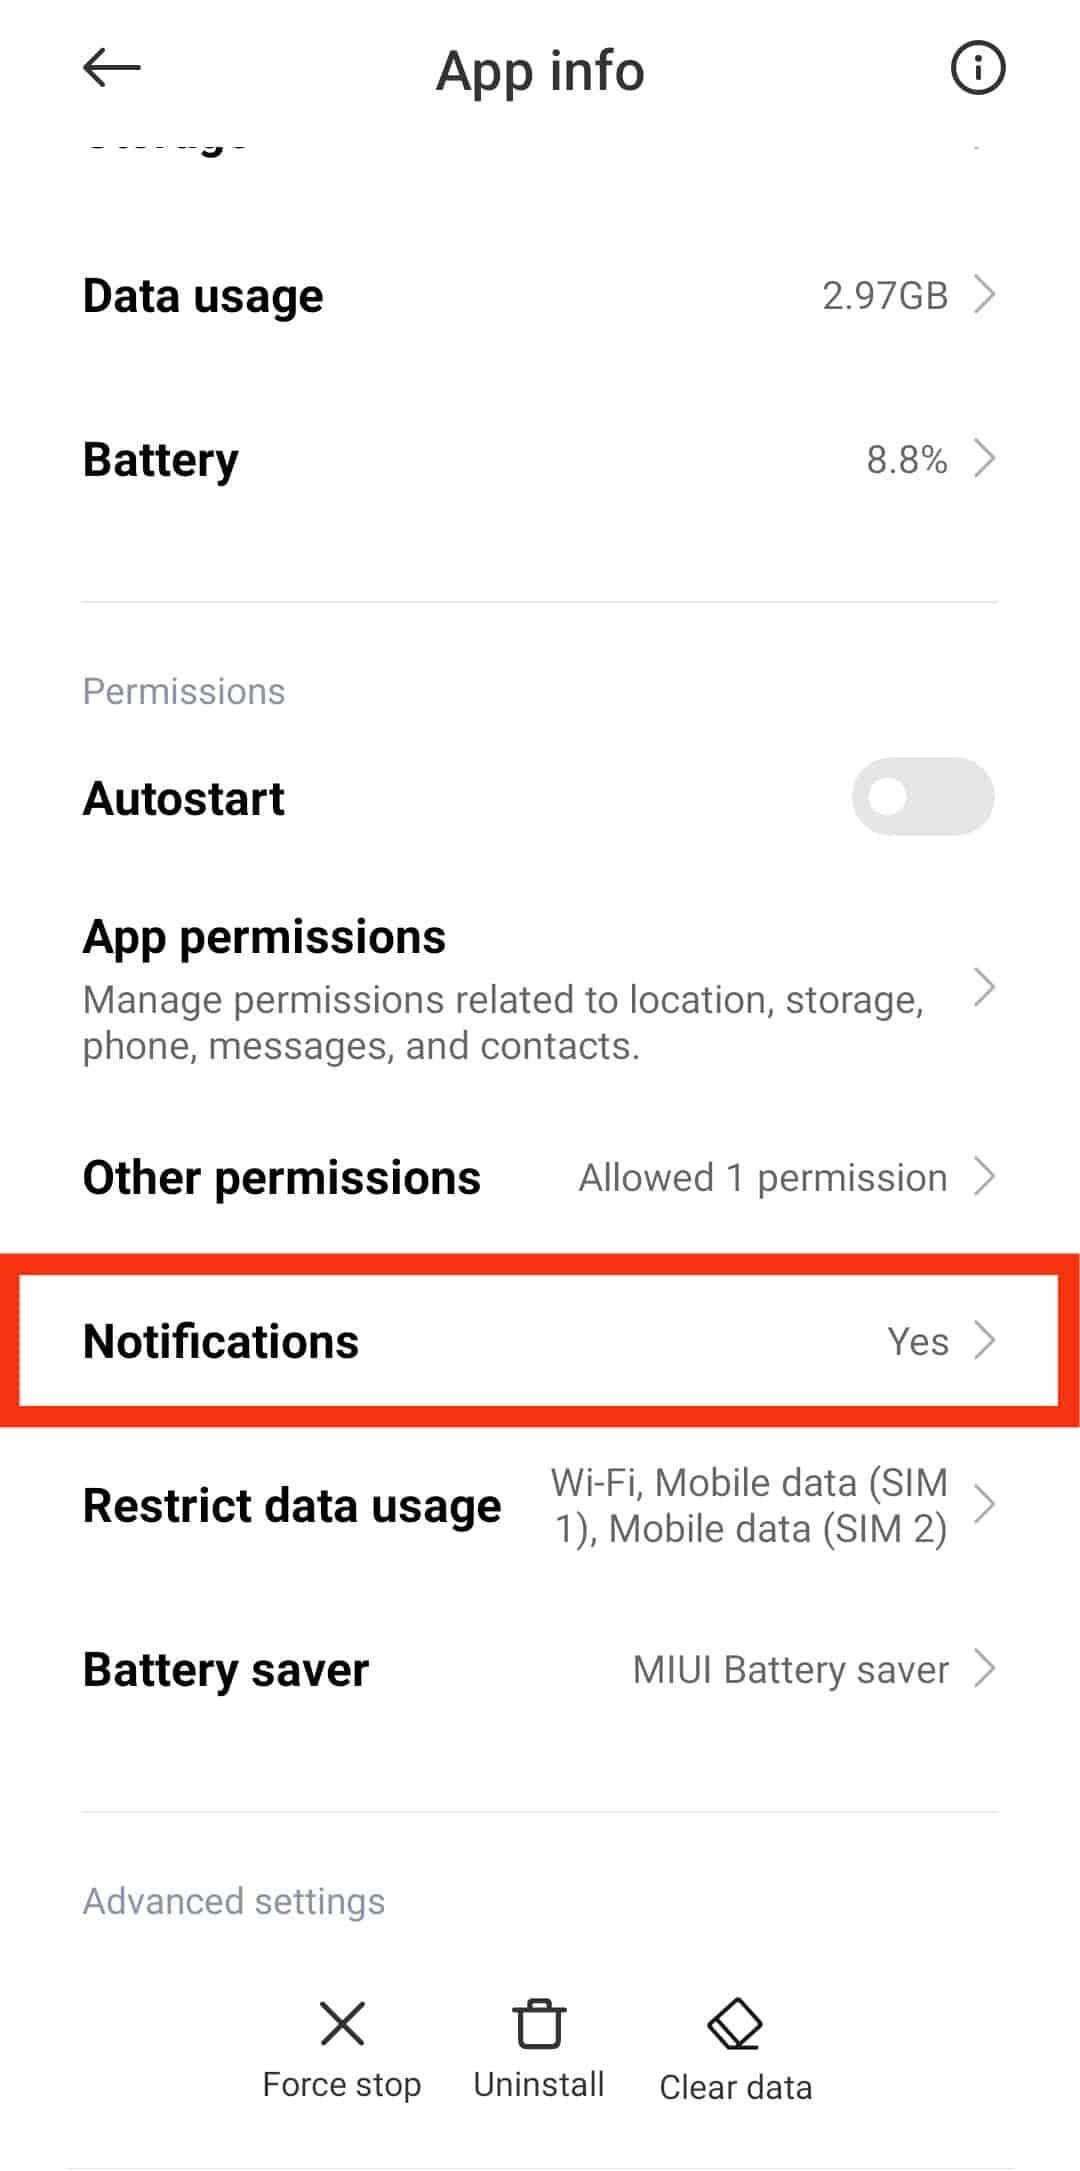
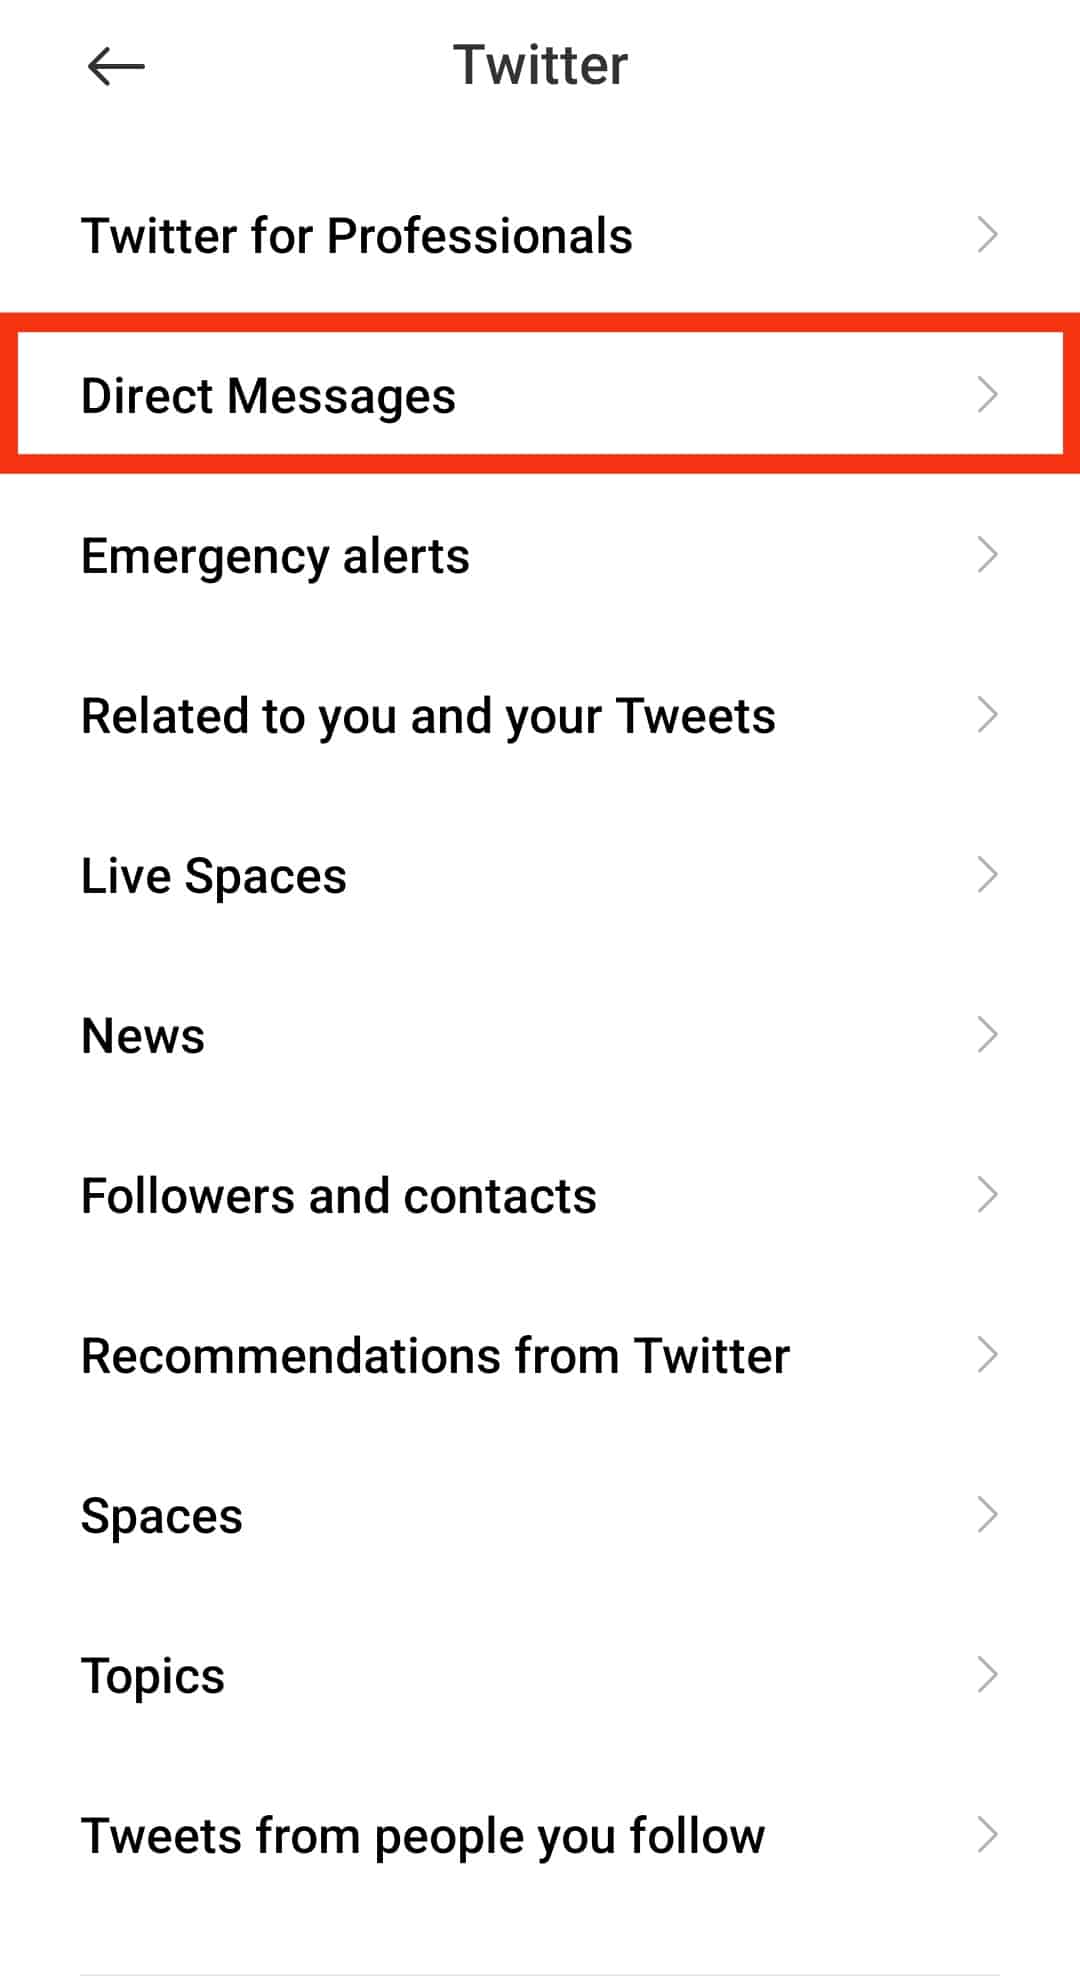
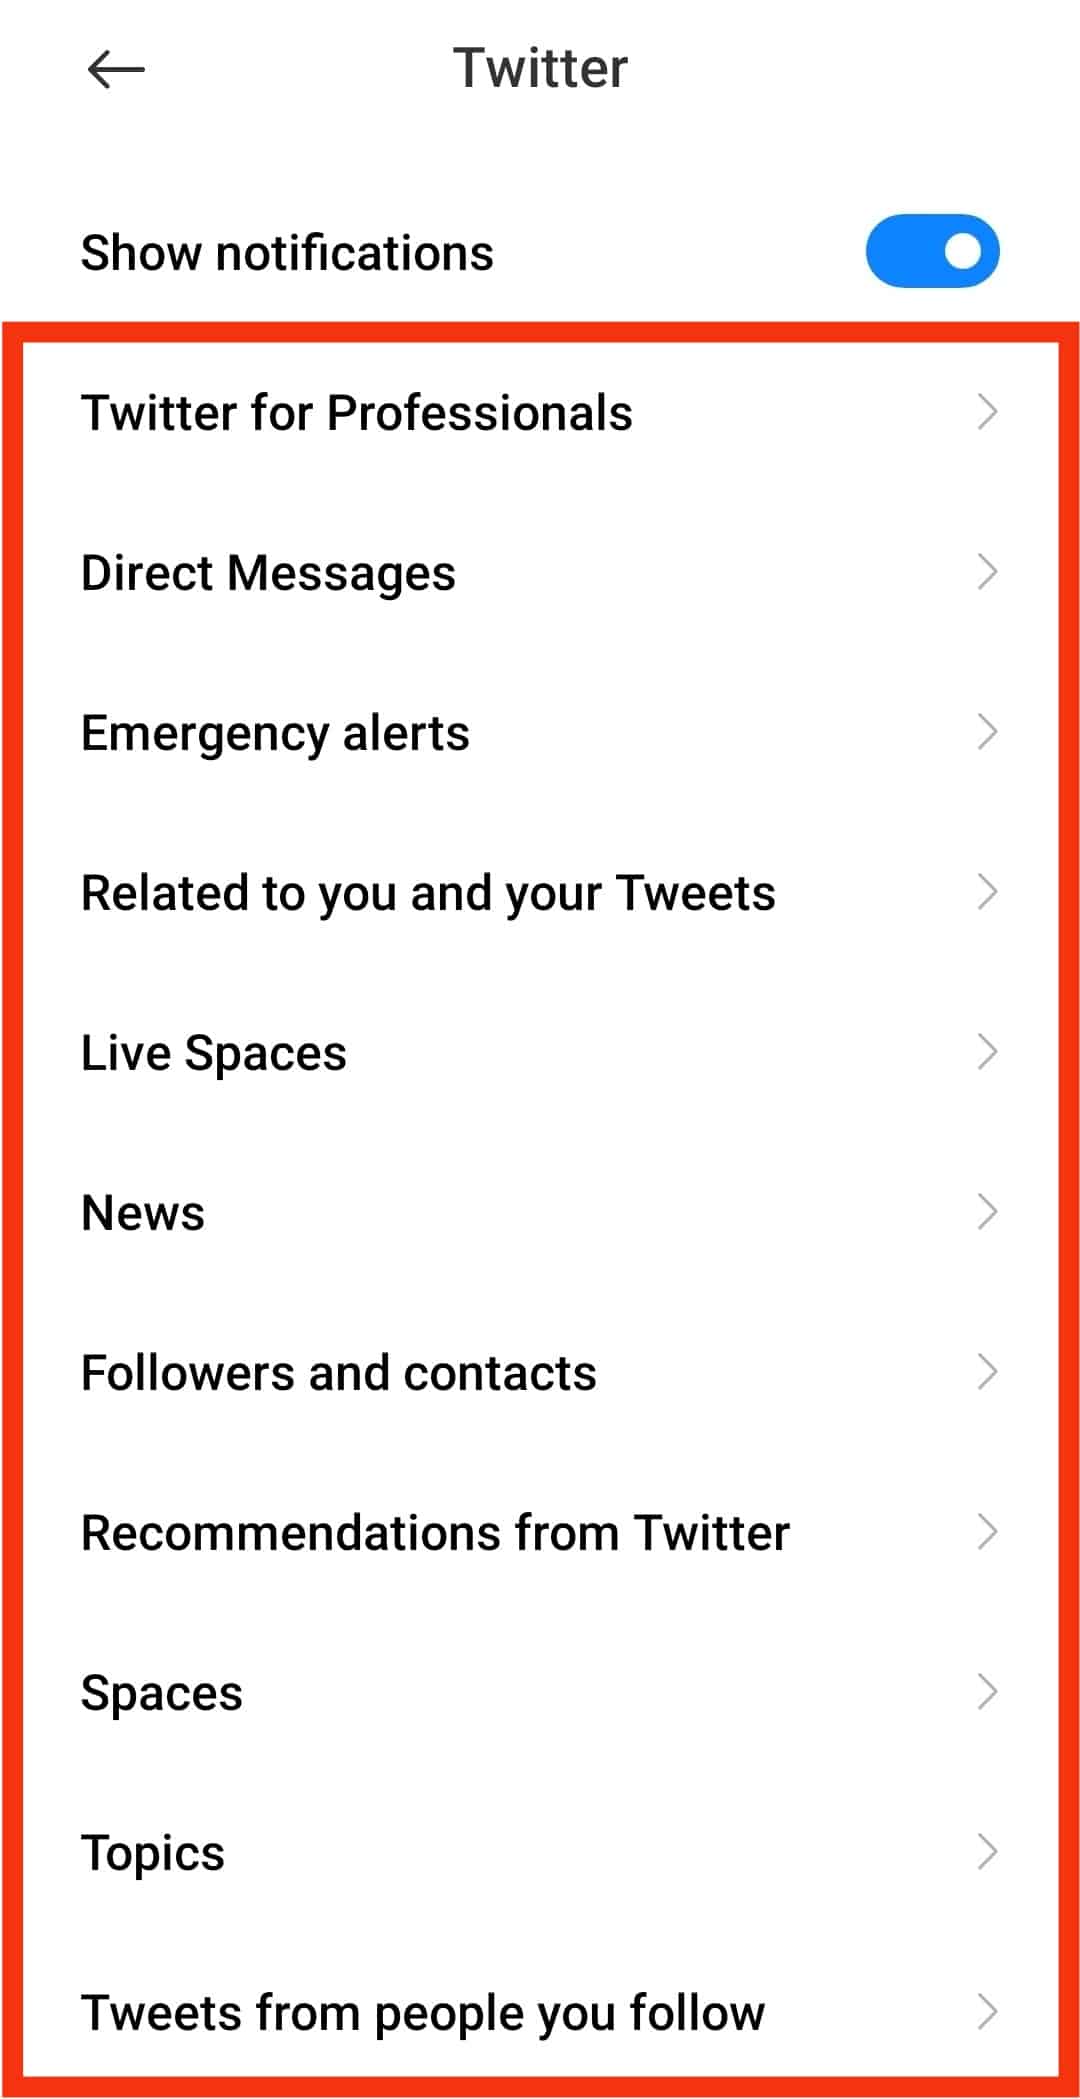
- Go to “Notifications.” You’ll see different Twitter notification categories.
- Tap on the category you’d like to change.
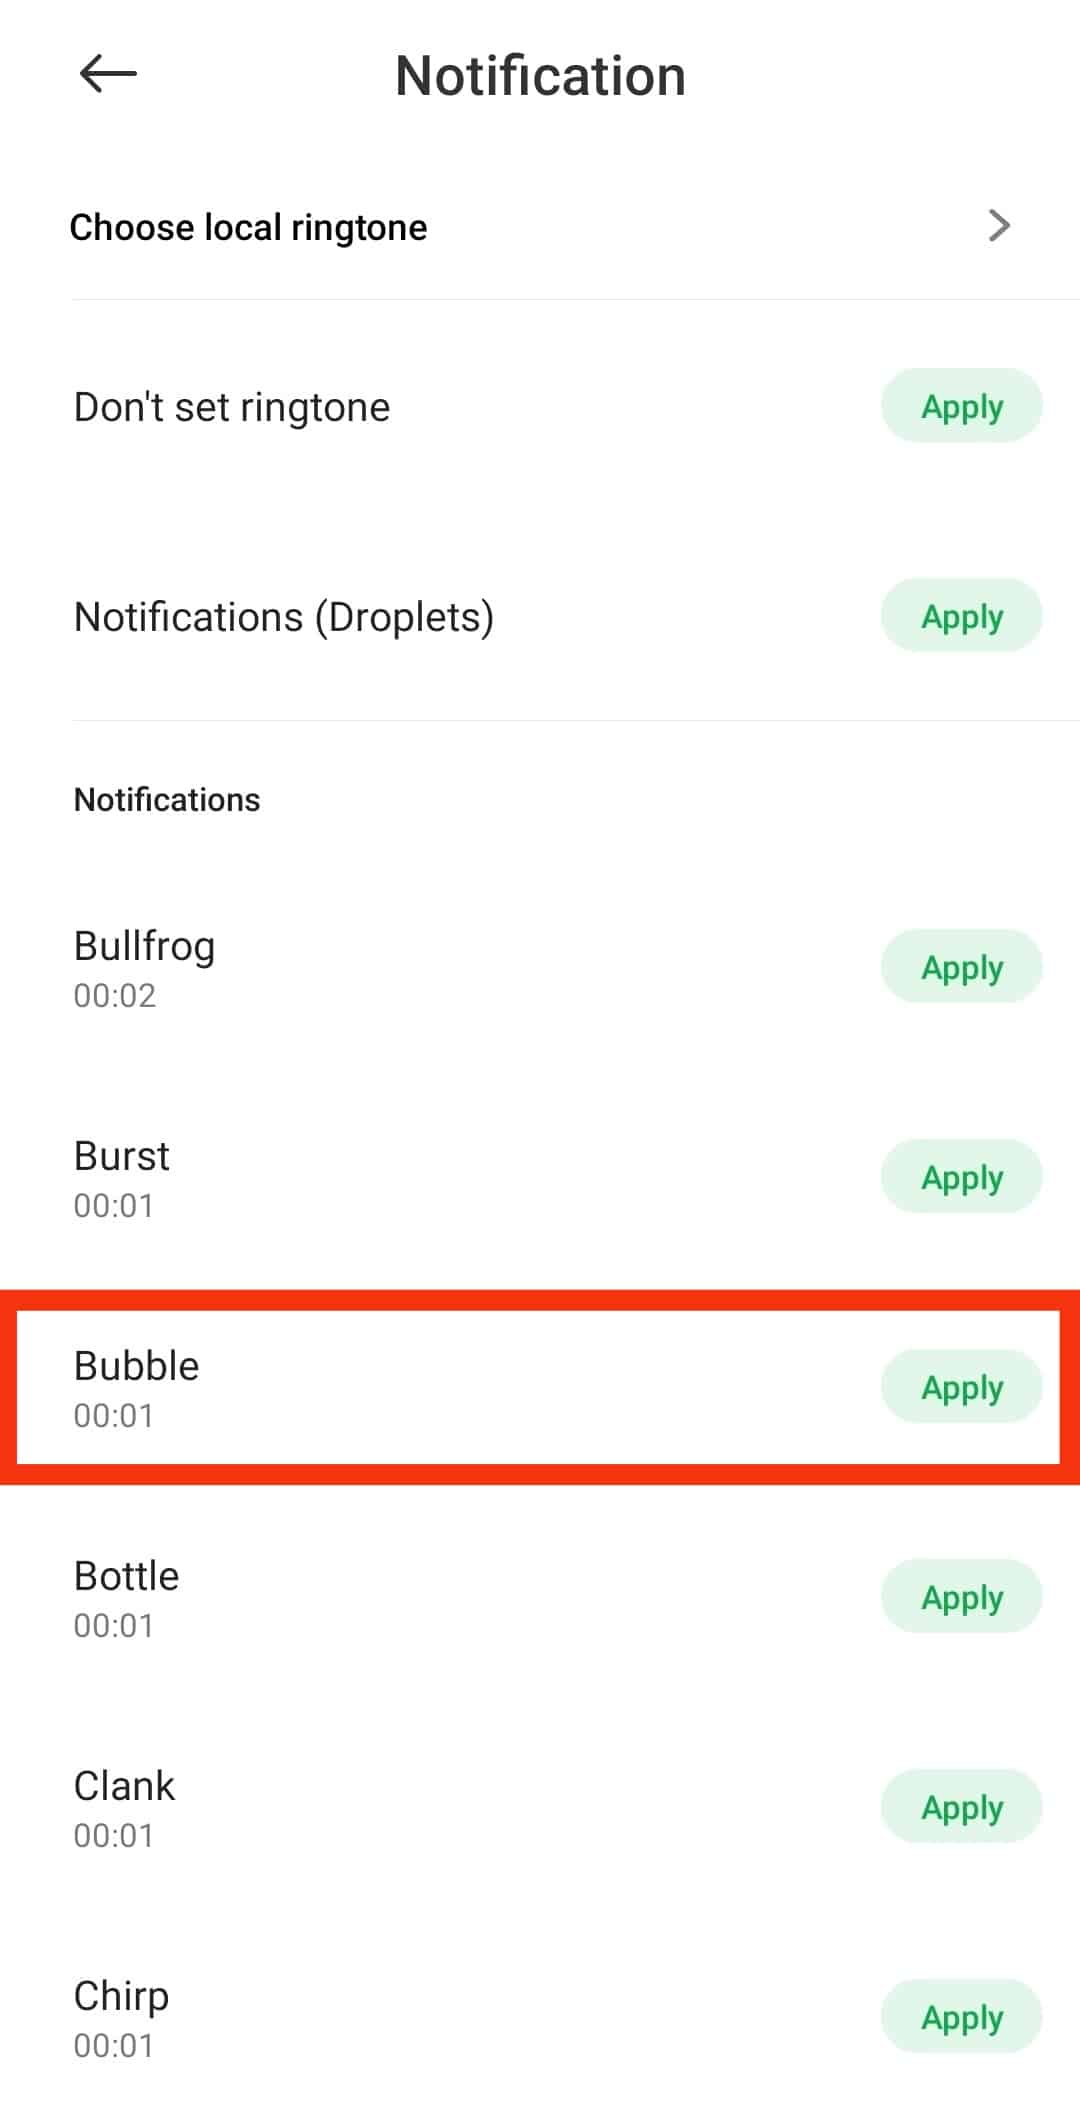
- Tap on “Sound.”
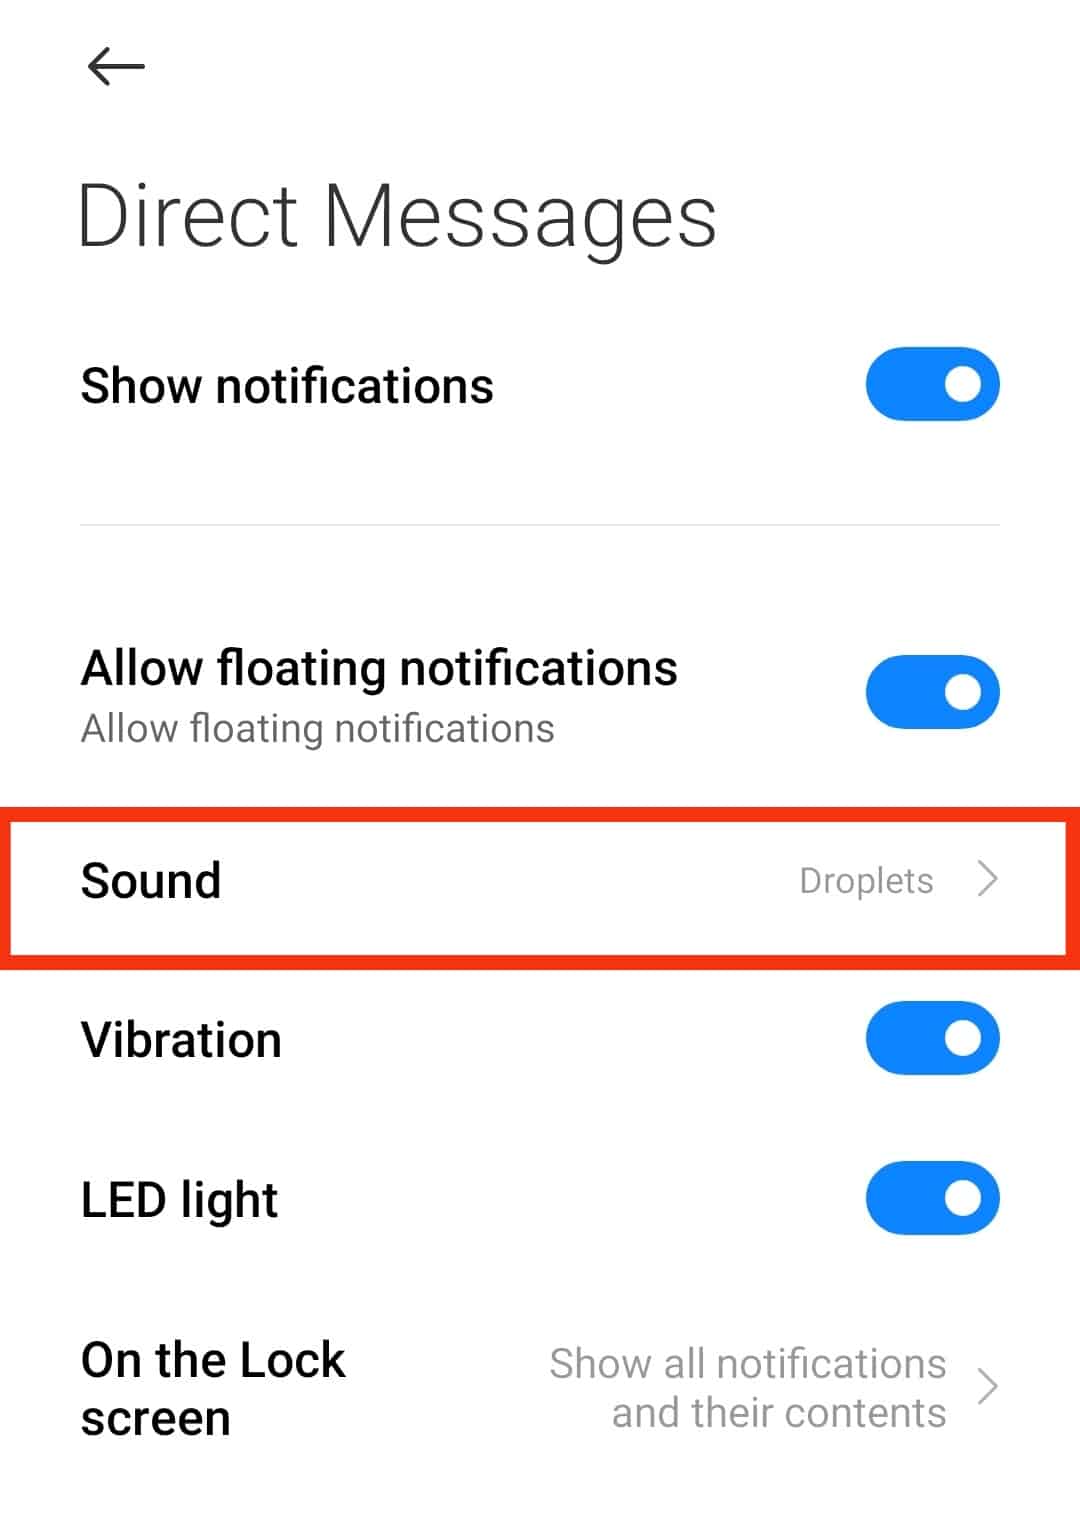
- Choose the one you like.
You can also use another notification sound by following the same procedure for other apps.
On an iPhone
Changing the Twitter notification sound on iPhones is not as simple. If you have iOS 14 or above, there is currently no option to change the Twitter notification sound. You can only toggle the notification sound on or off.
To turn on the notification sound for Twitter on an iPhone, follow these steps:
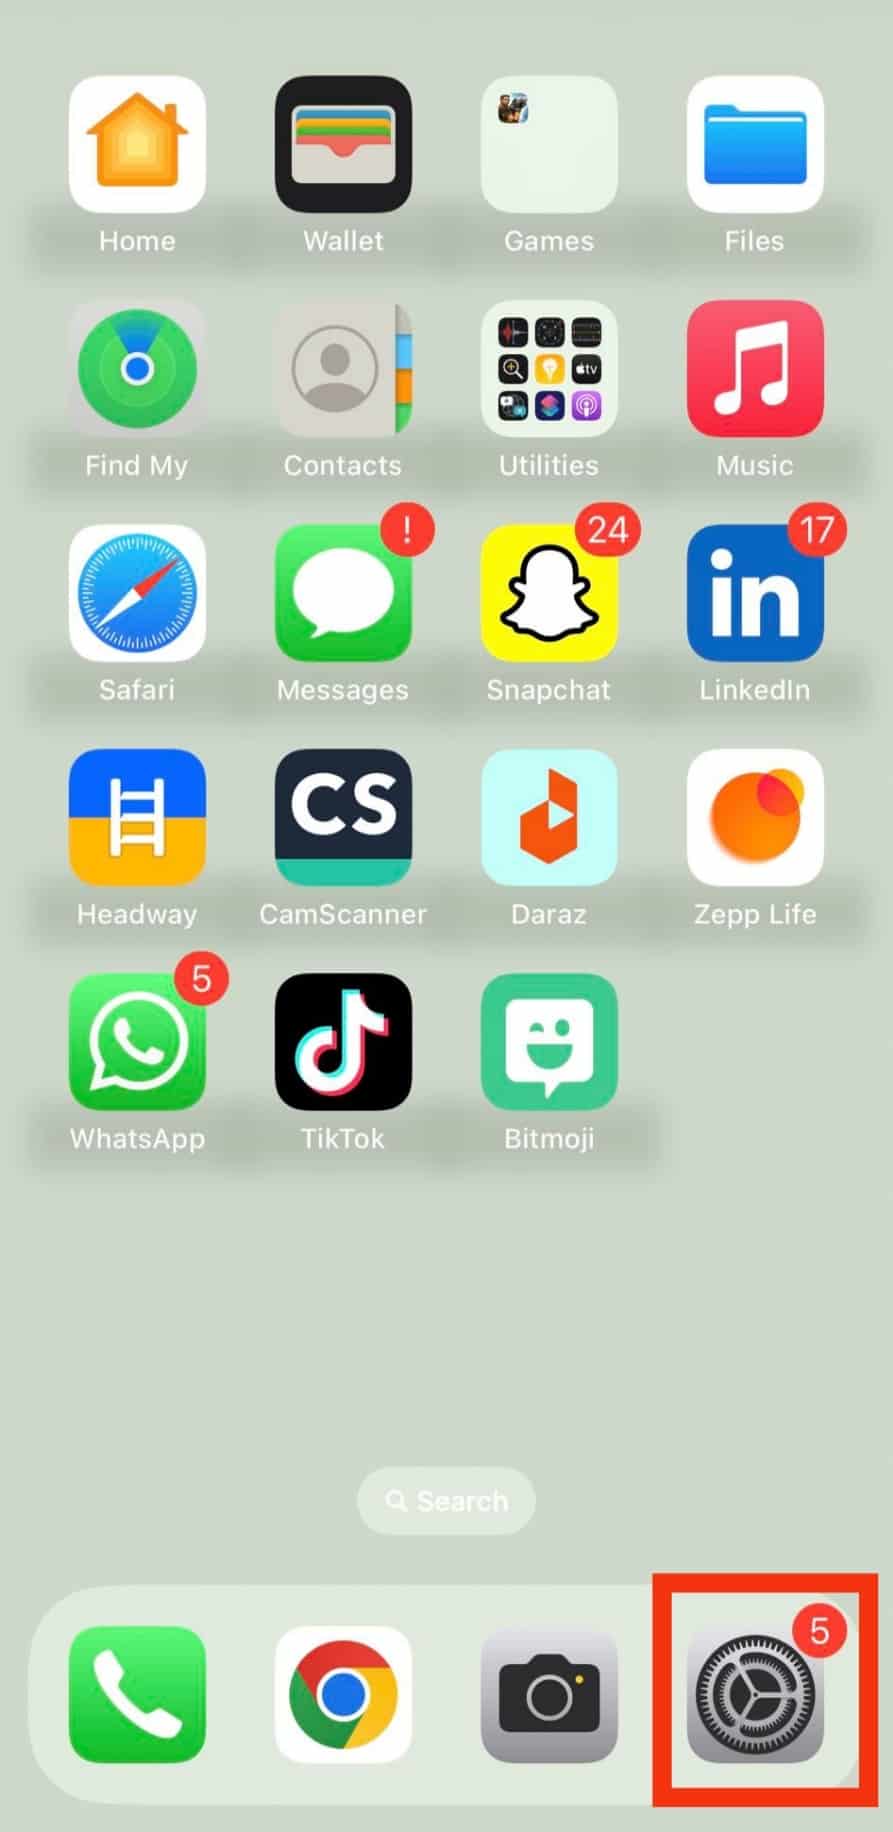
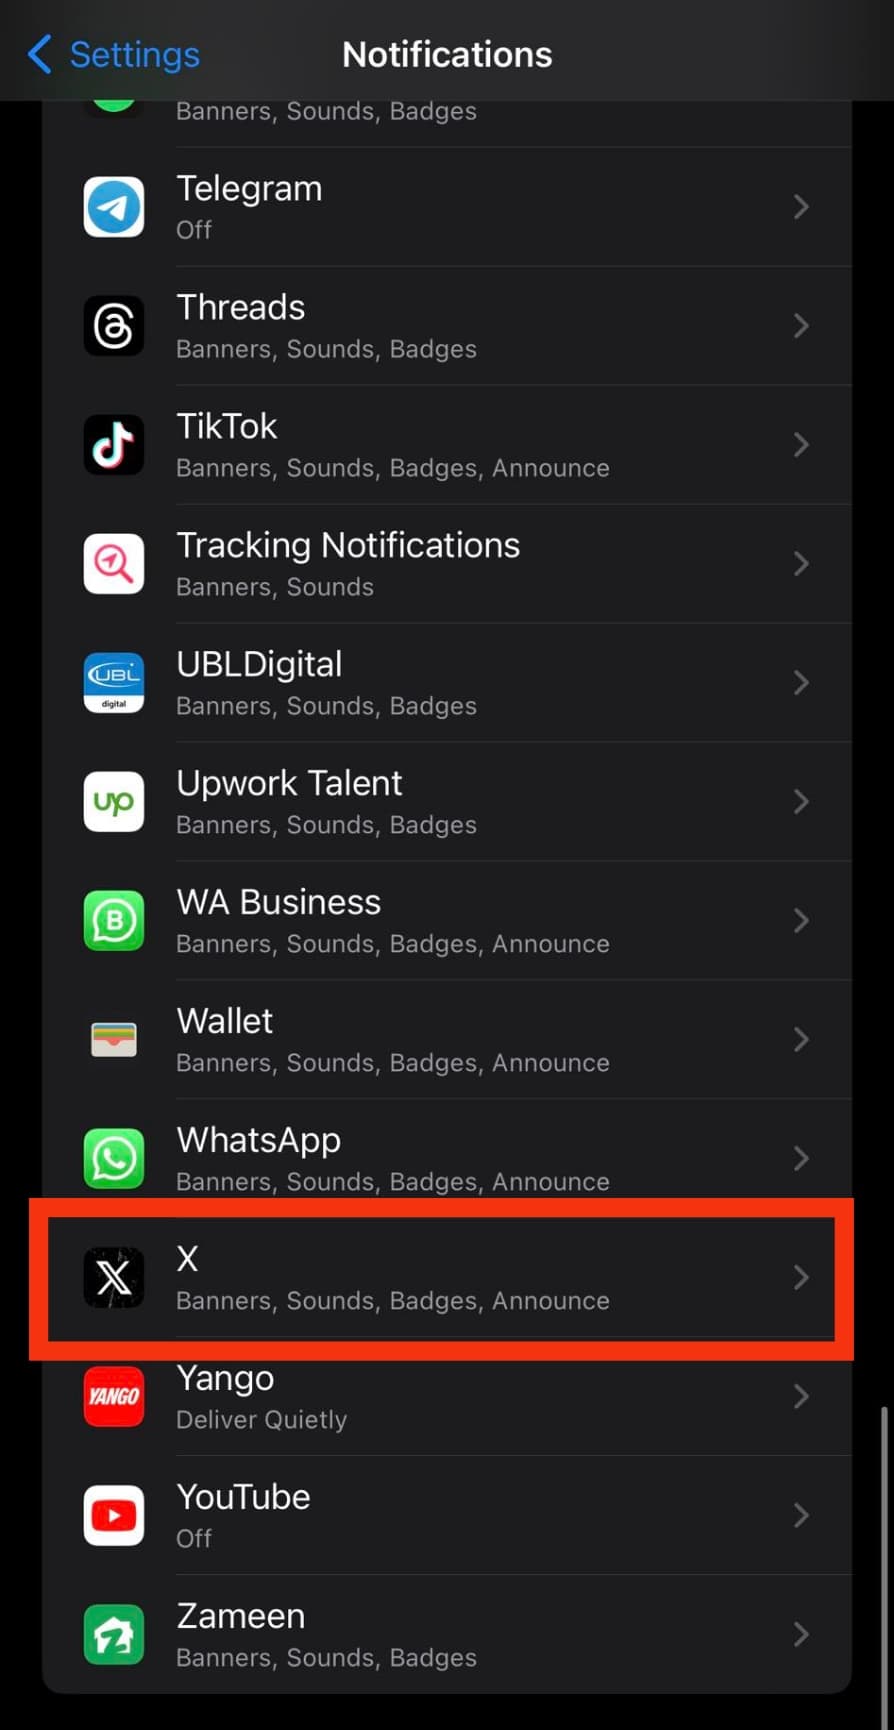
- Open the Settings app on your iPhone.
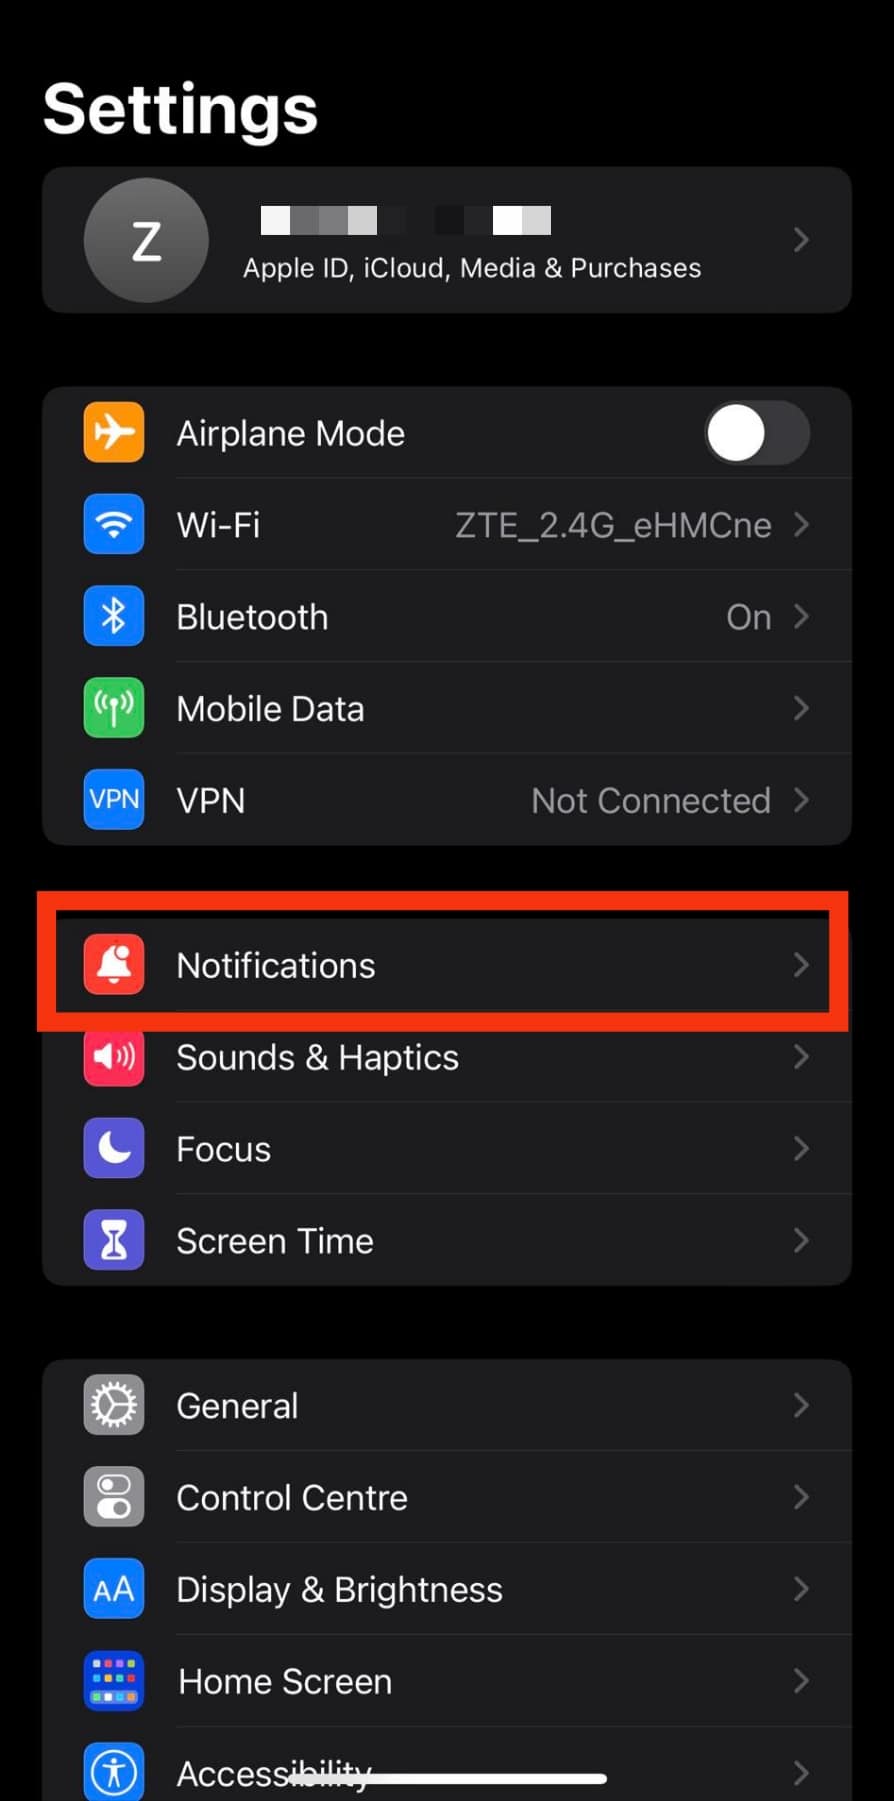
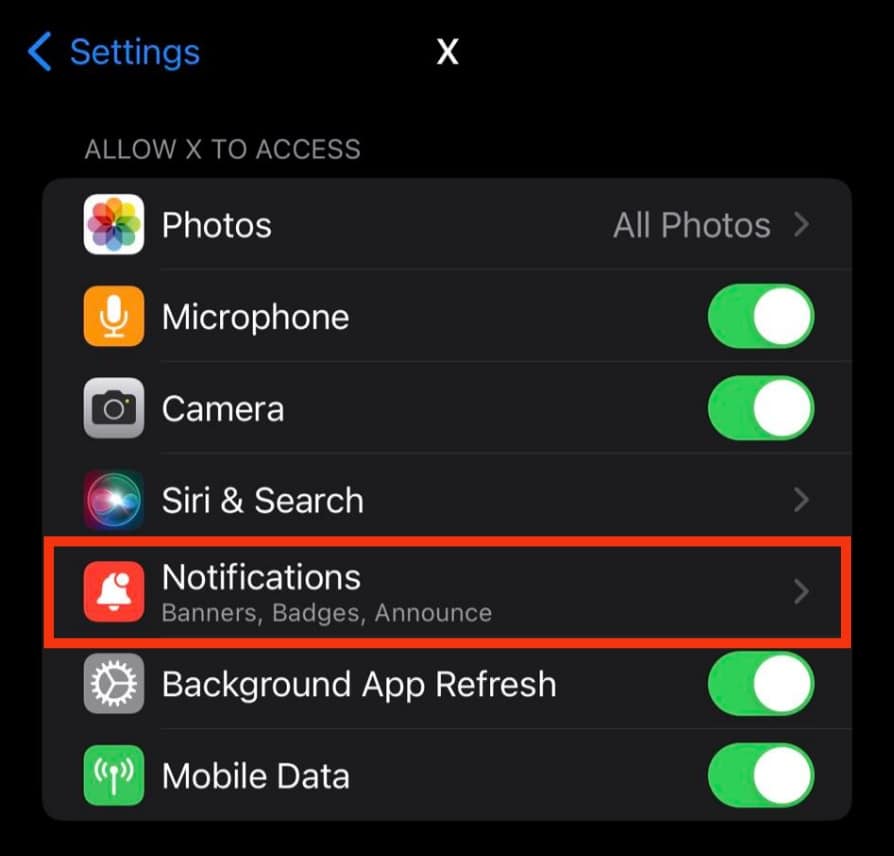
- Select “Notifications.”
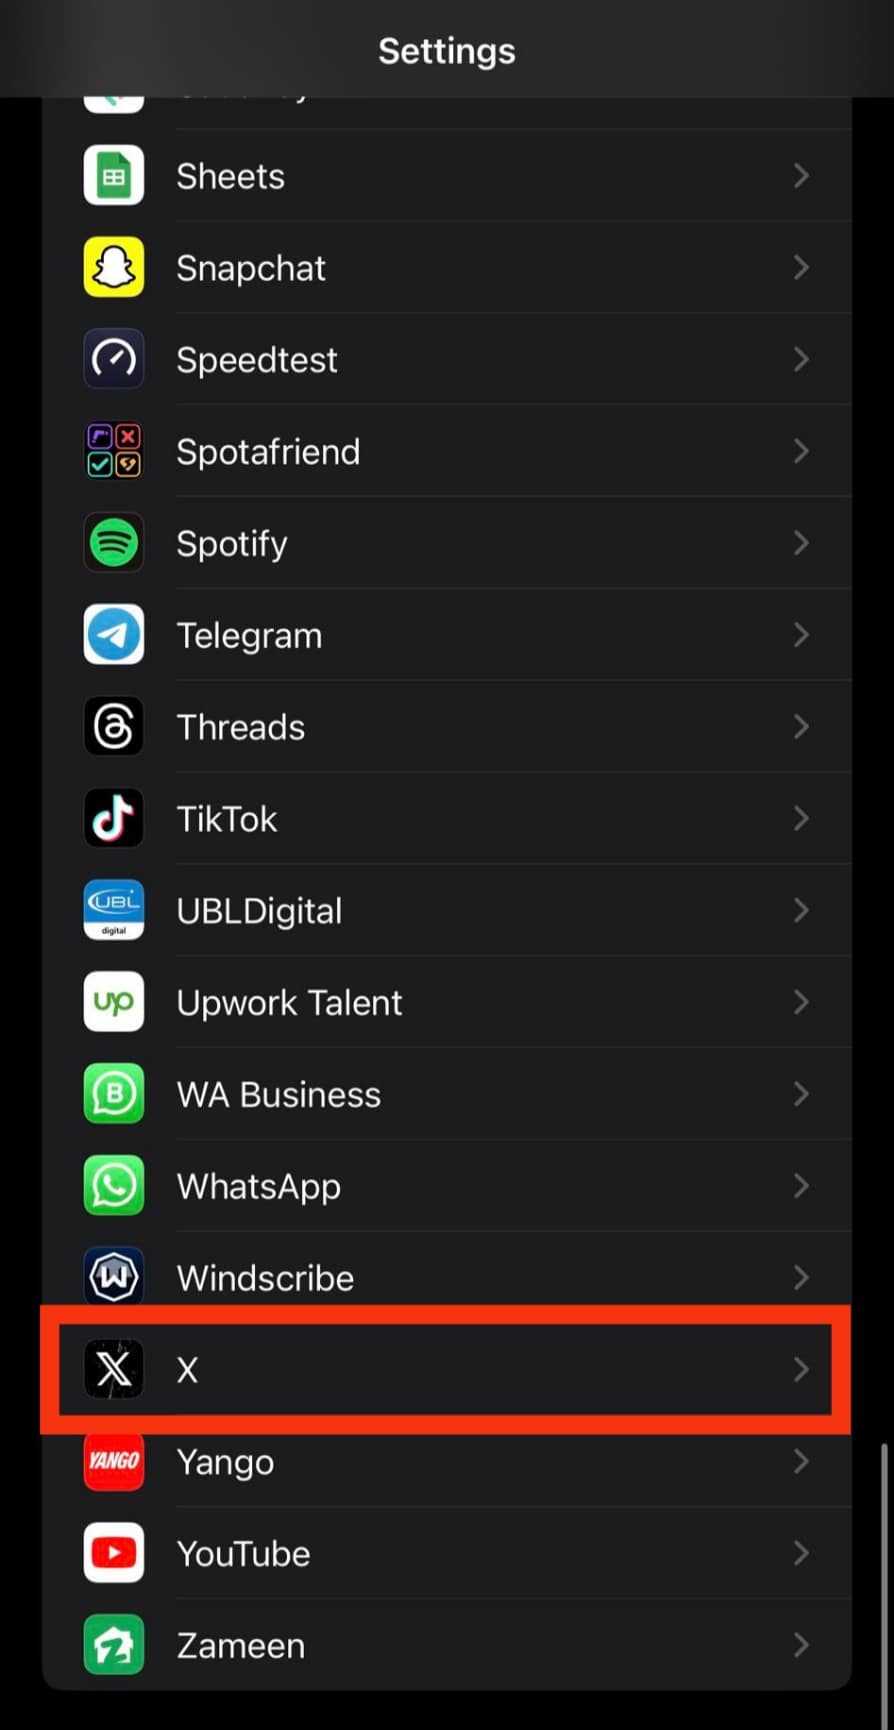
- Scroll down and select “Twitter” or “X“.
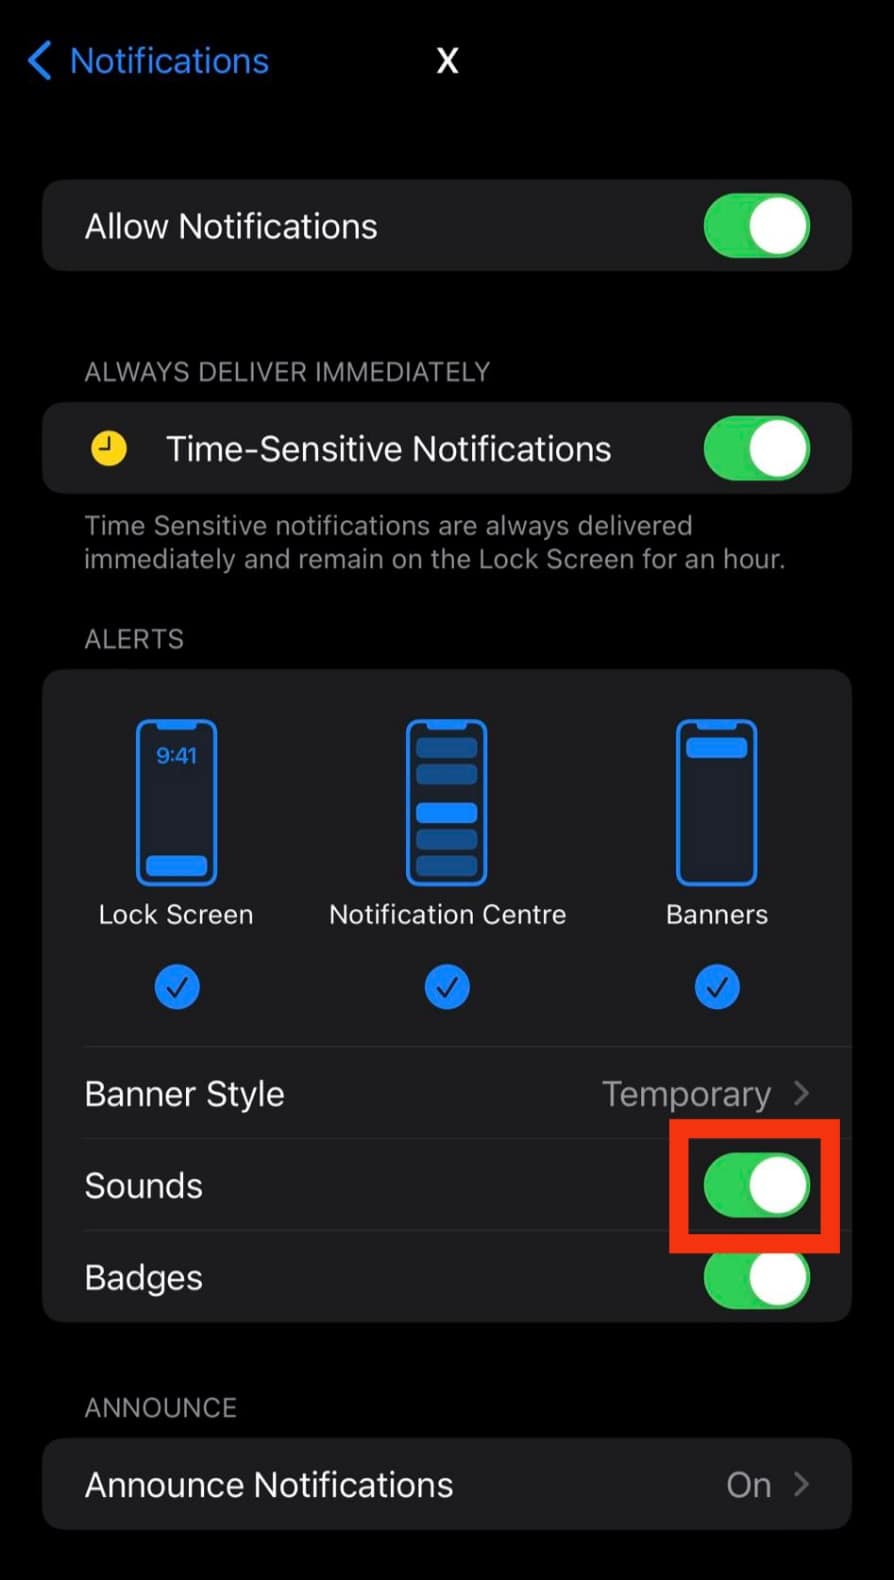
- Toggle on the “Sounds” option.
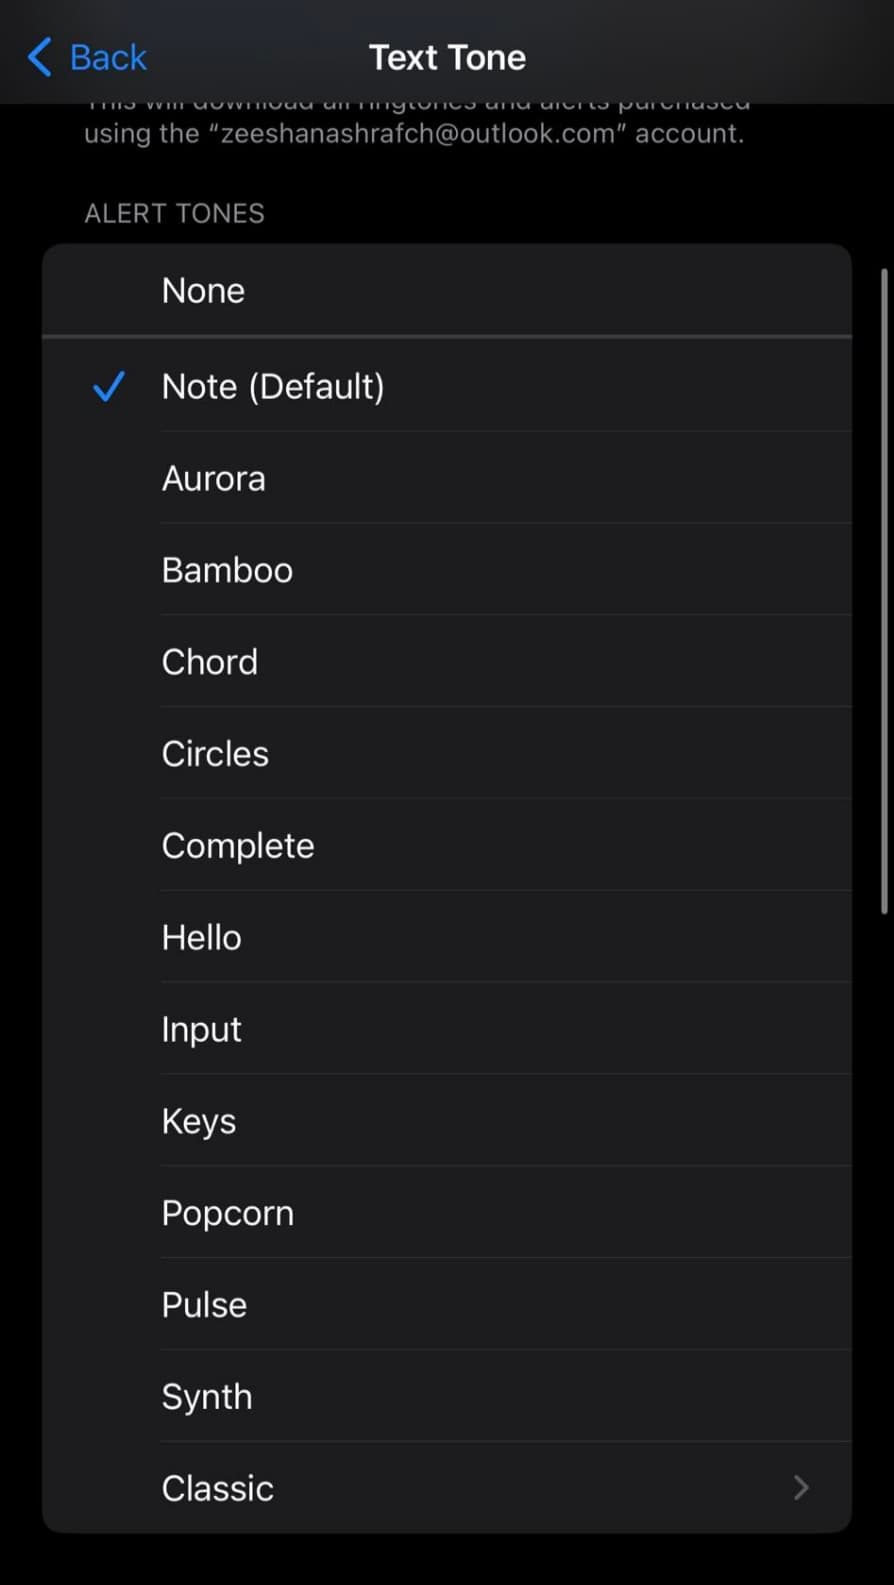
As a workaround, you can change the Twitter notification sound by changing the text tone sound. Follow these steps:
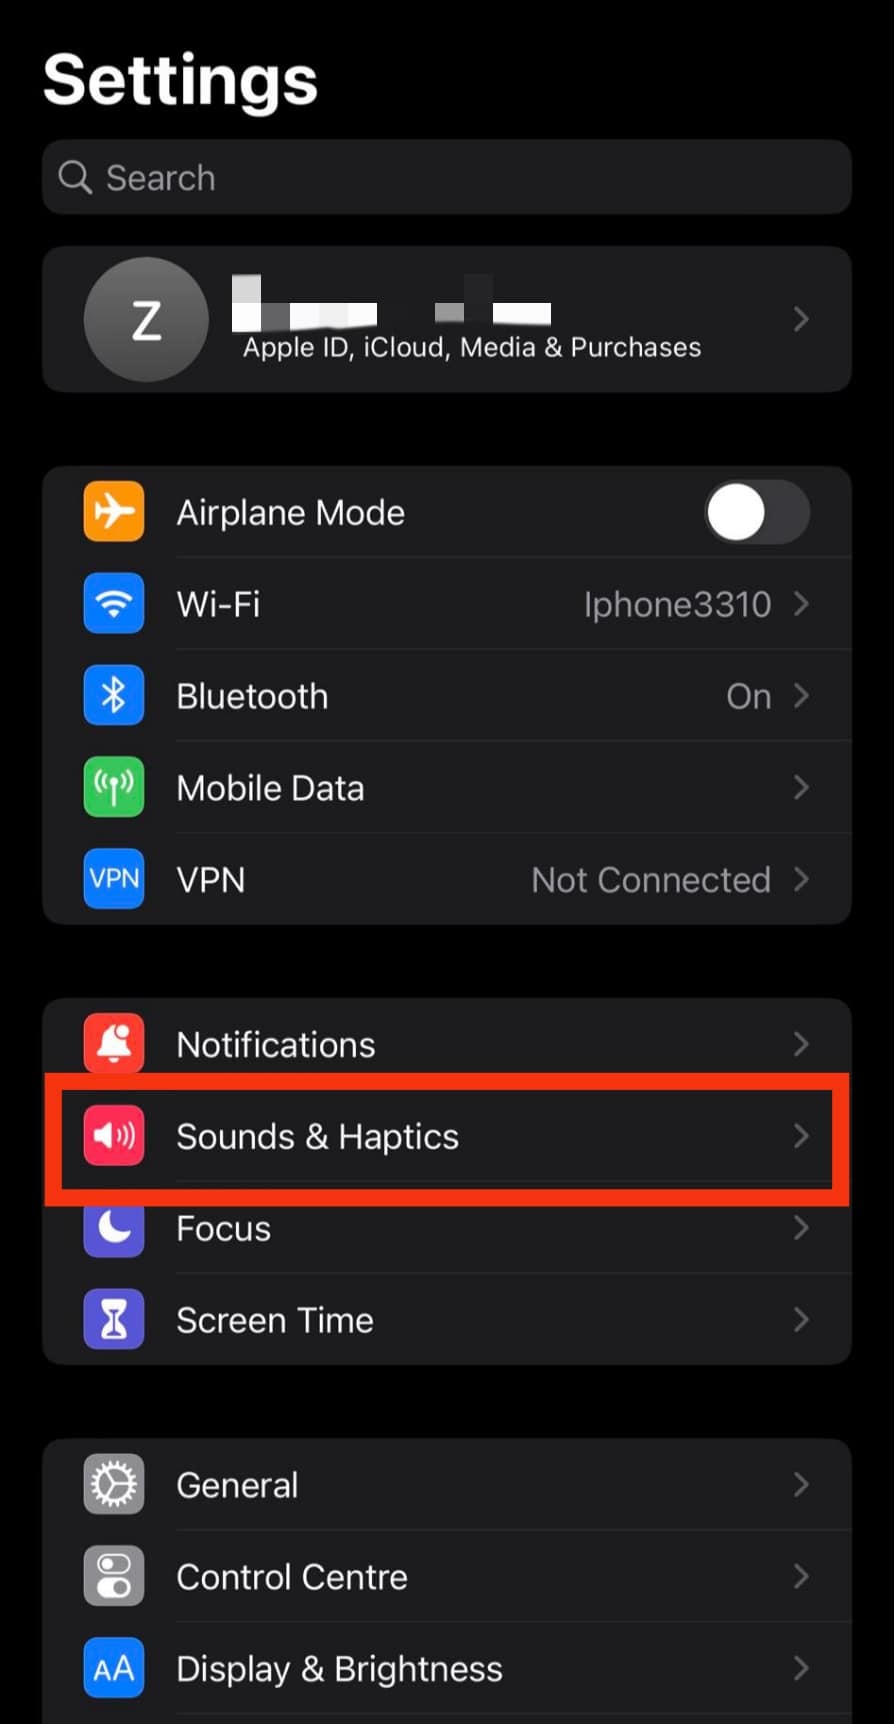
- Open the Settings app on your iPhone.
- Select “Sounds & Haptics.”
- Select “Text Tone” under “Sounds and haptic patterns.”
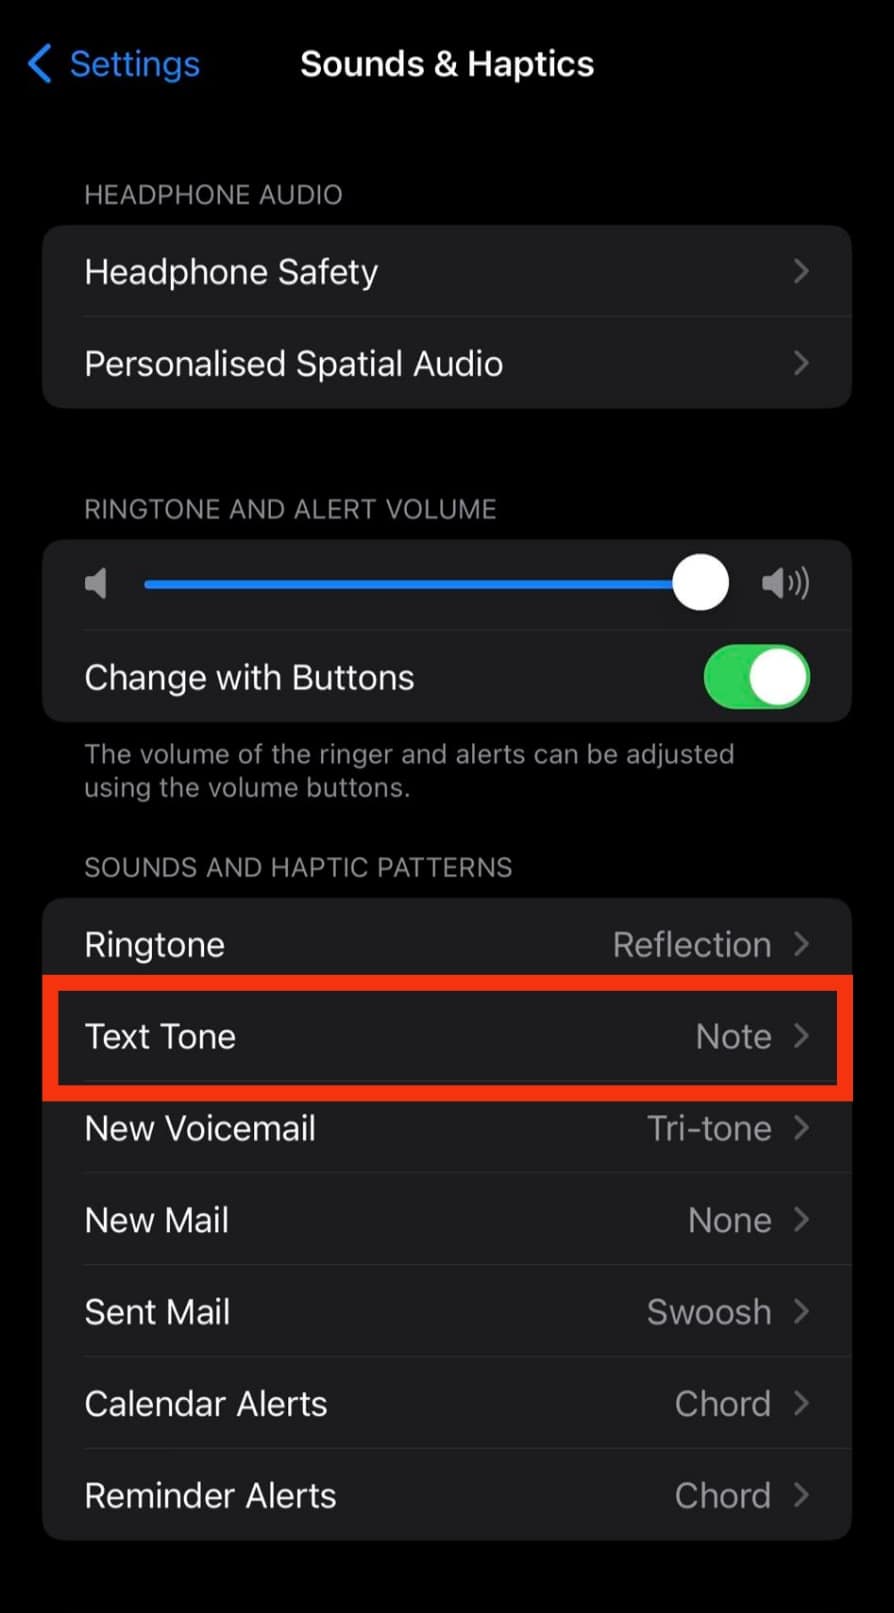
- Select the sound you like the most.
Why Can’t I See My Twitter Notifications?
Most Twitter users experience this problem now and then. It could be due to the reasons mentioned below.
Reason #1: You’ve Deactivated Your Push Notifications
It is a Twitter function that lets you receive notifications when you’re off Twitter.
Here is how to activate your push notification:
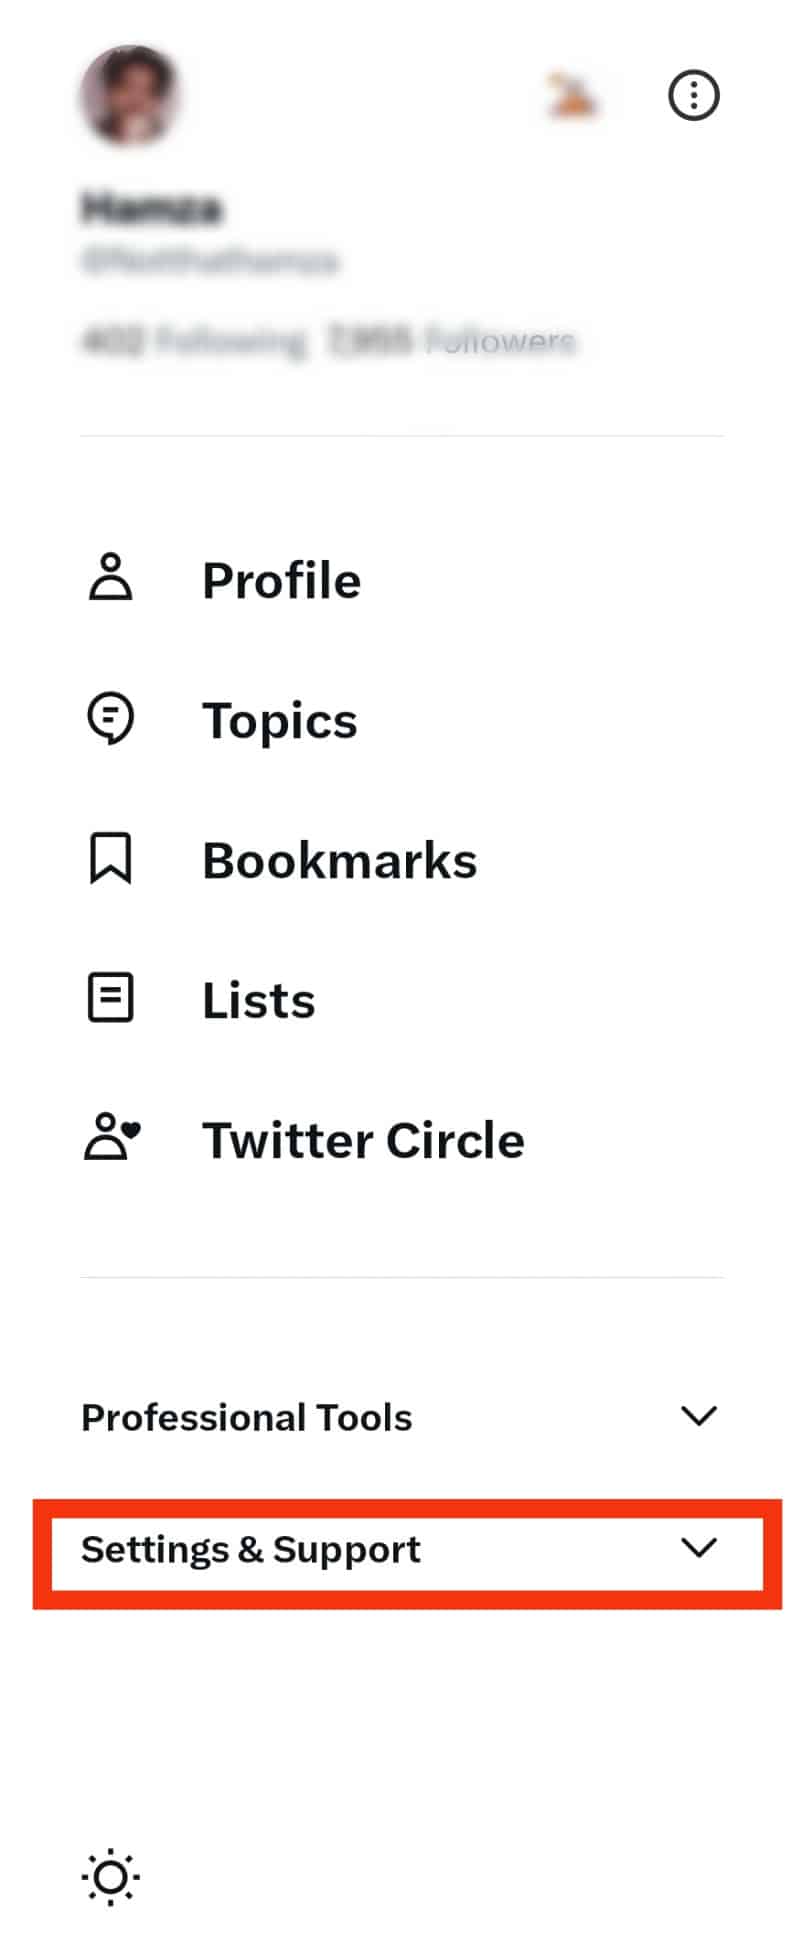
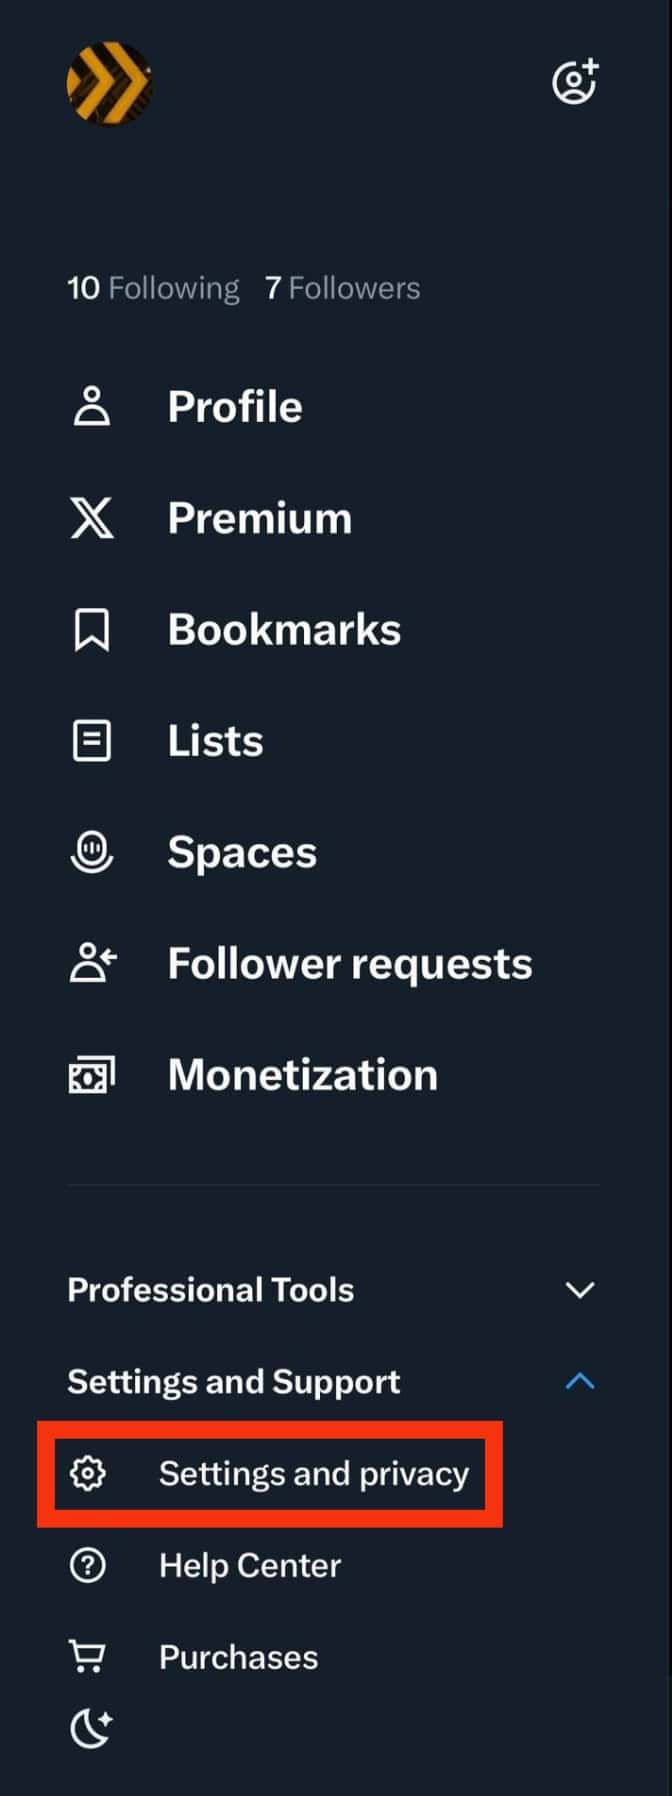
- Open Twitter and tap the profile picture in the top left corner.

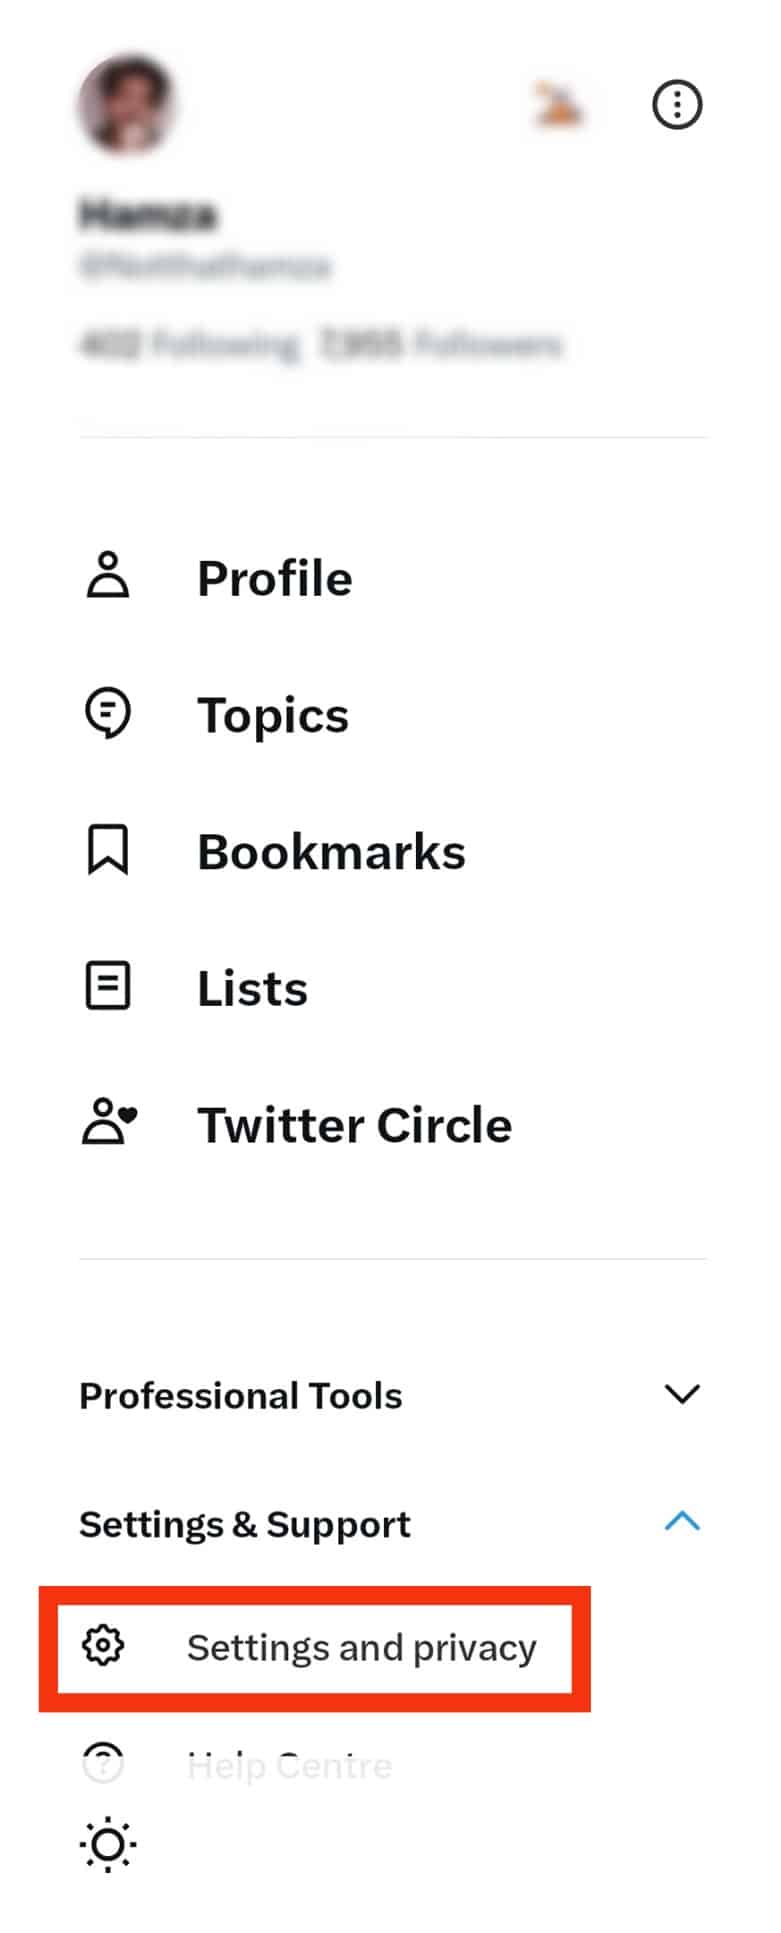
- Tap on “Settings & Support.”
- Go to “Settings and privacy.”
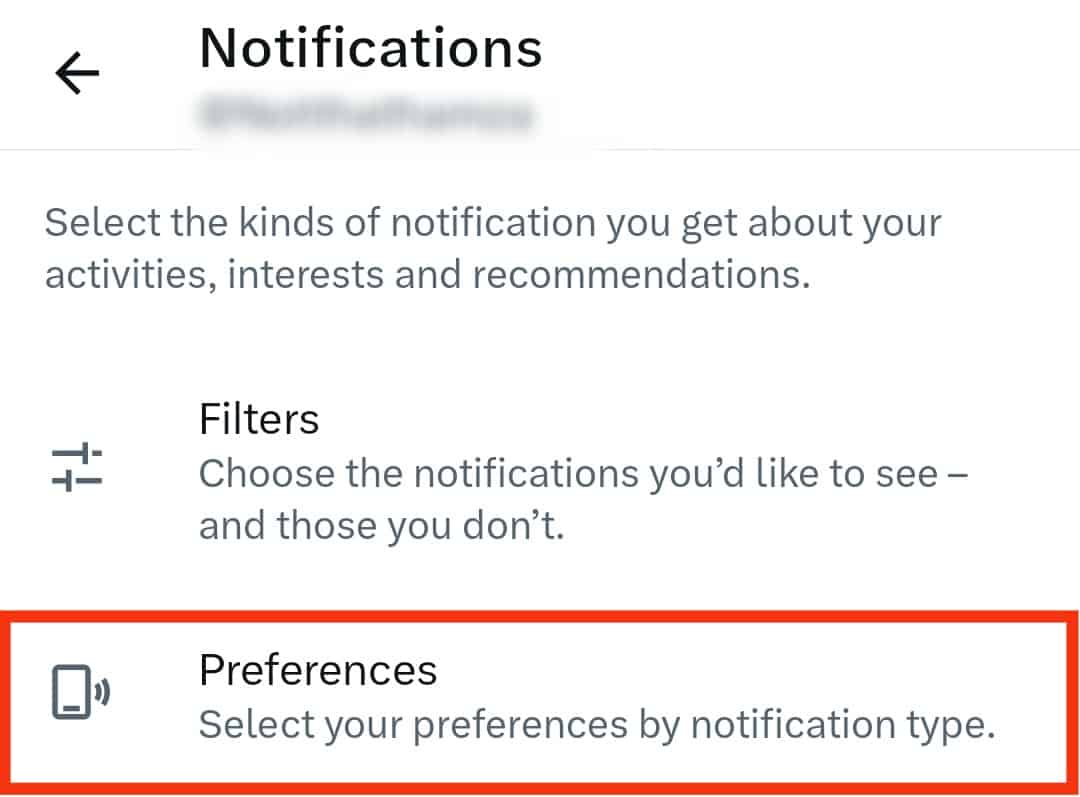
- Select “Notifications.”
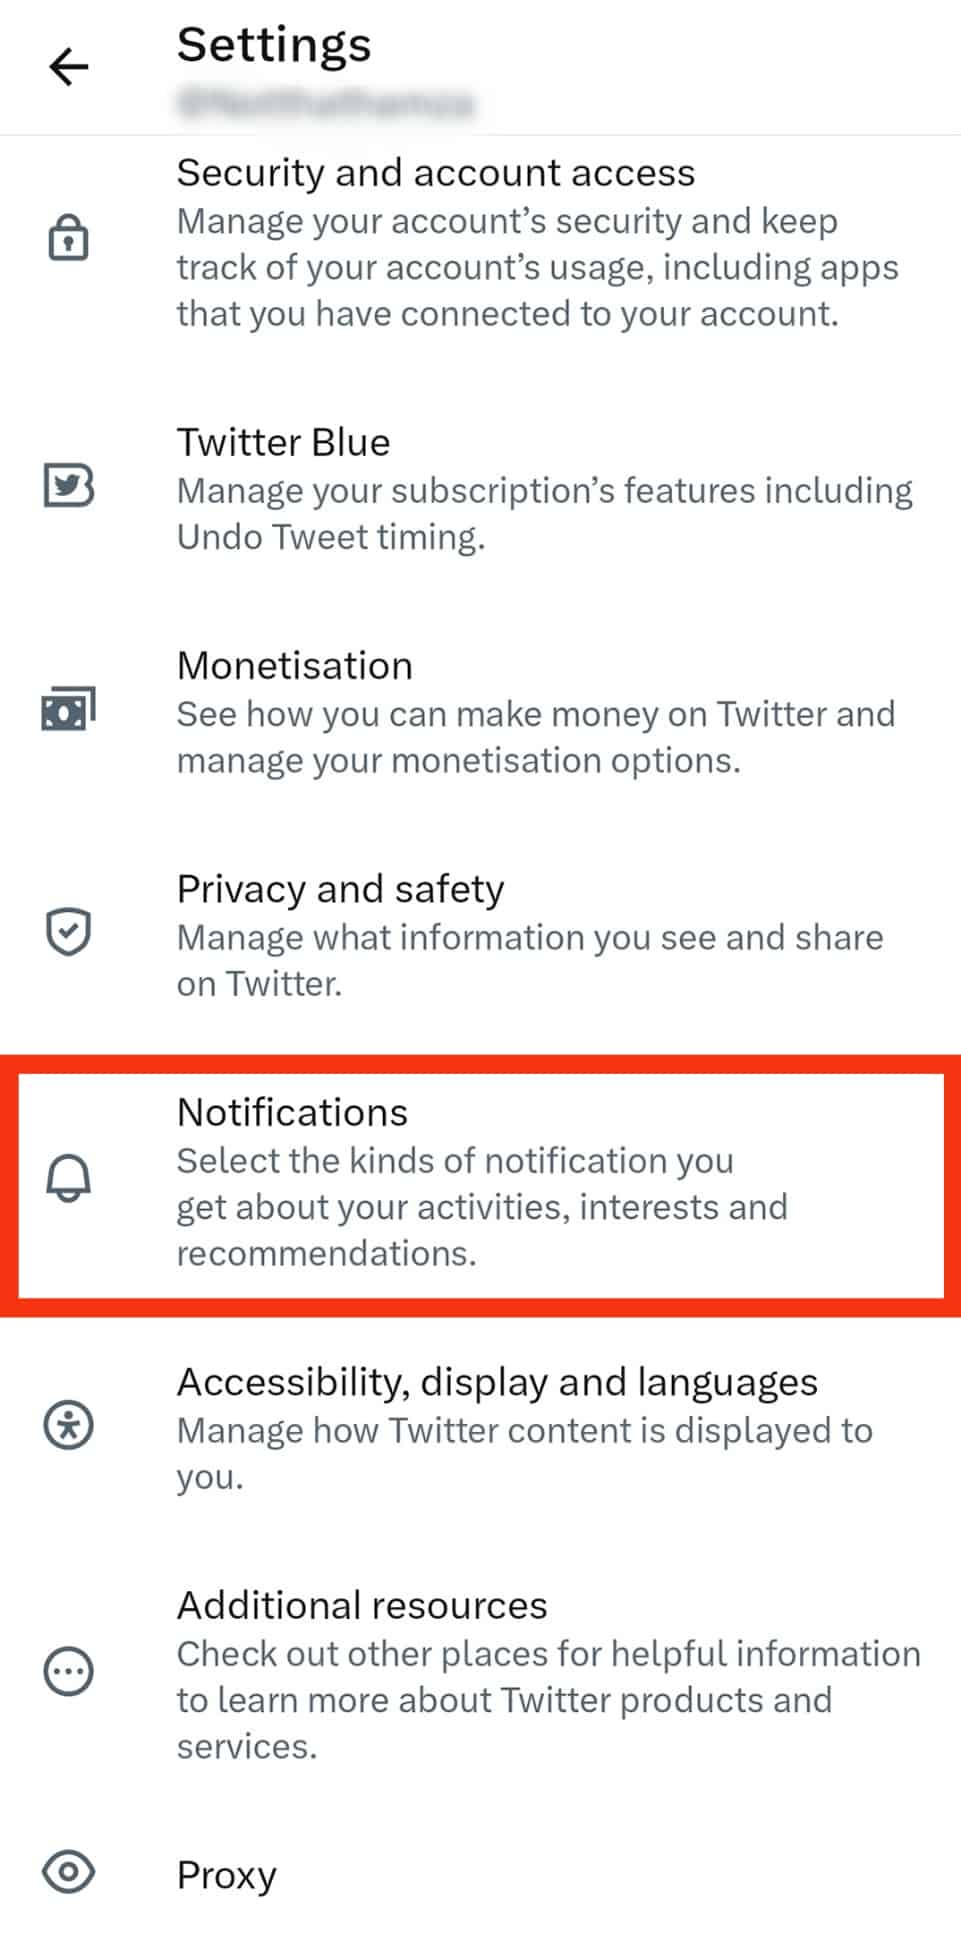
- Select the “Preferences” option to manage your notifications.
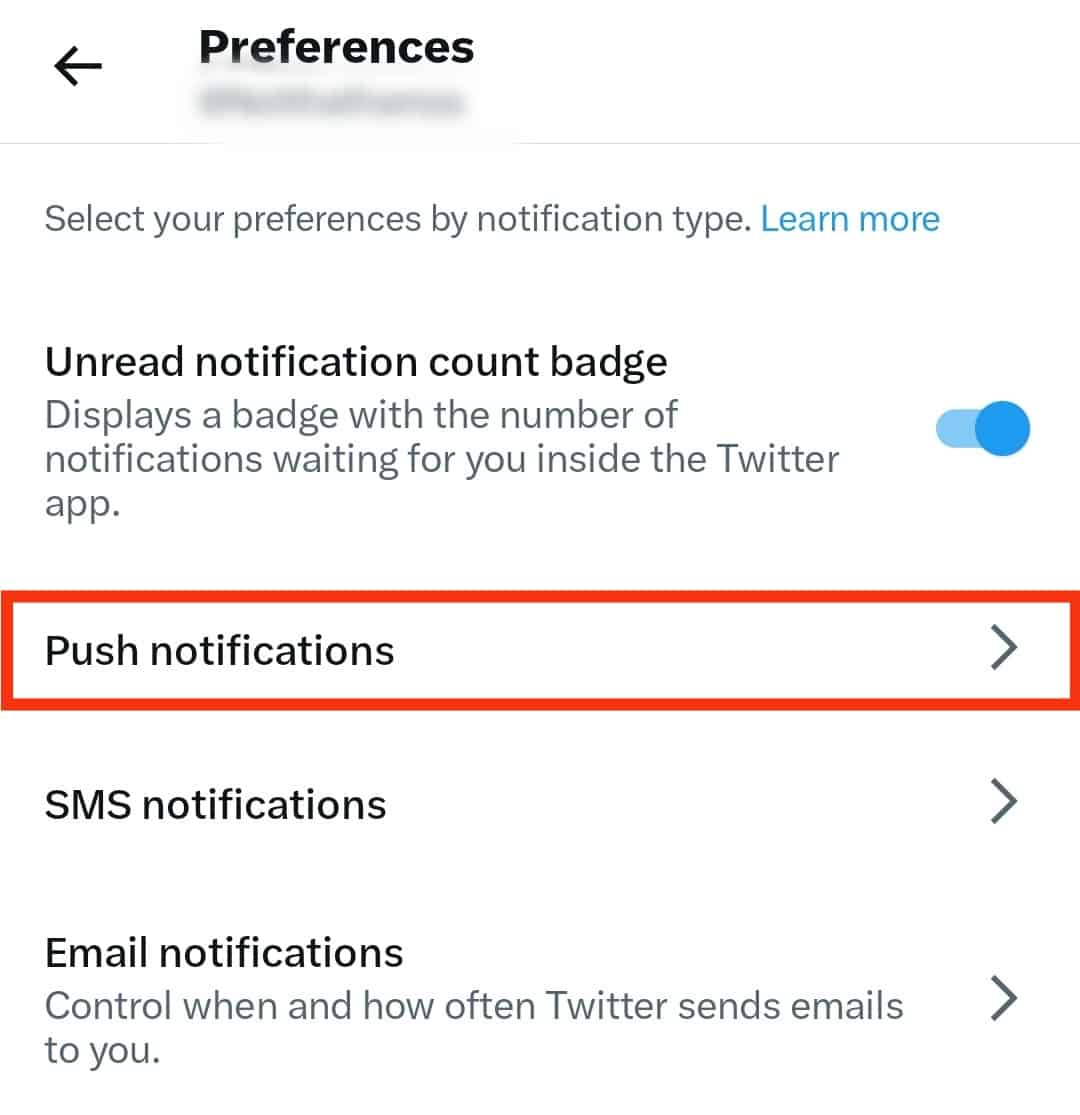
- Go to “Push notifications.” The Push notification page allows you to manage notifications for separate Twitter functions.
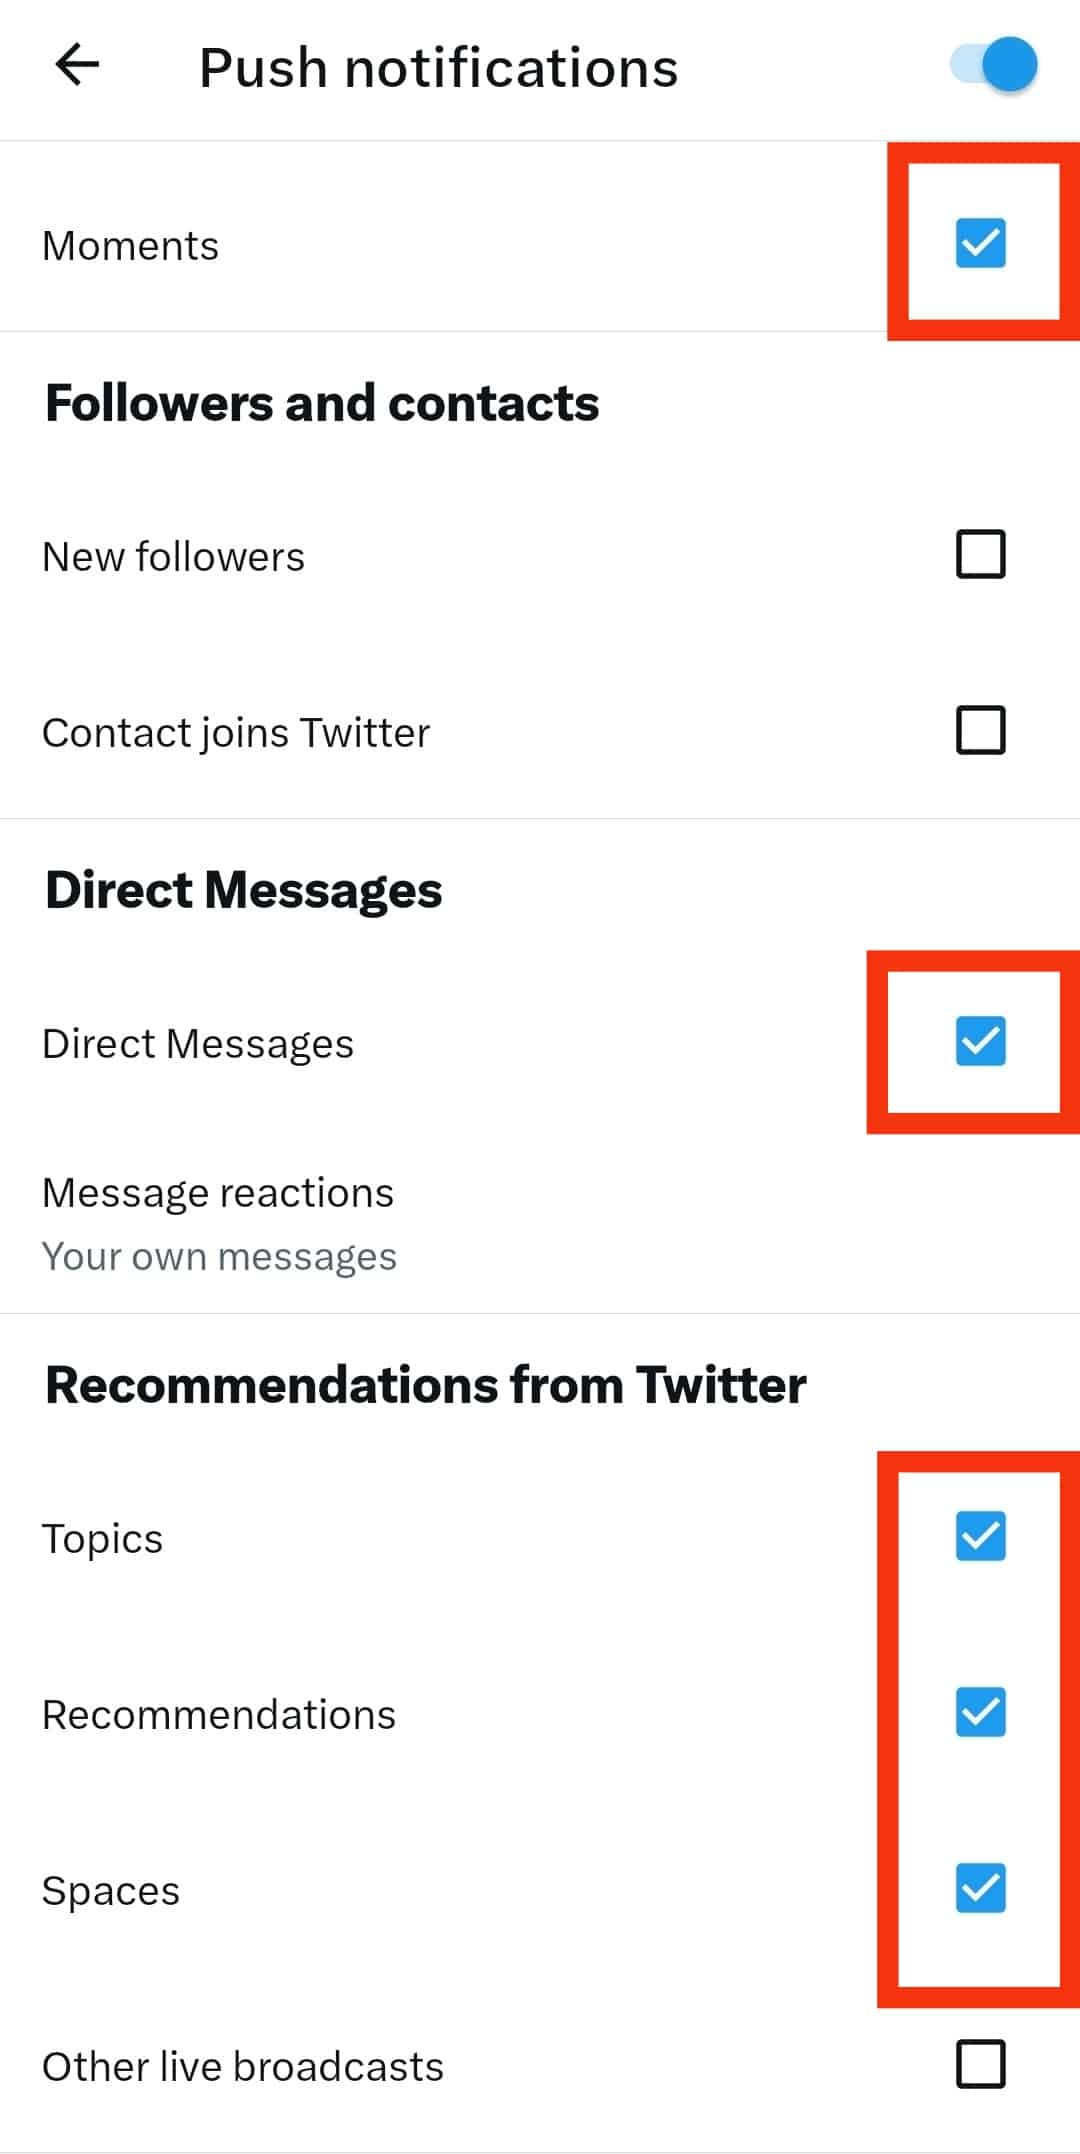
- Turn on the push notification you’d like to receive.
Reason #2: You’ve Blocked Twitter Notifications
You may fail to receive notifications from Twitter if you’ve blocked or not allowed Twitter to send notifications to your phone.
Activate push notifications on the Twitter app as shown above and permit Twitter to send notifications to your phones.
On Android Phones
Follow these steps:
- Open the Settings app.
- Select “Apps.”
- Select “See all x apps” or “Manage apps.”
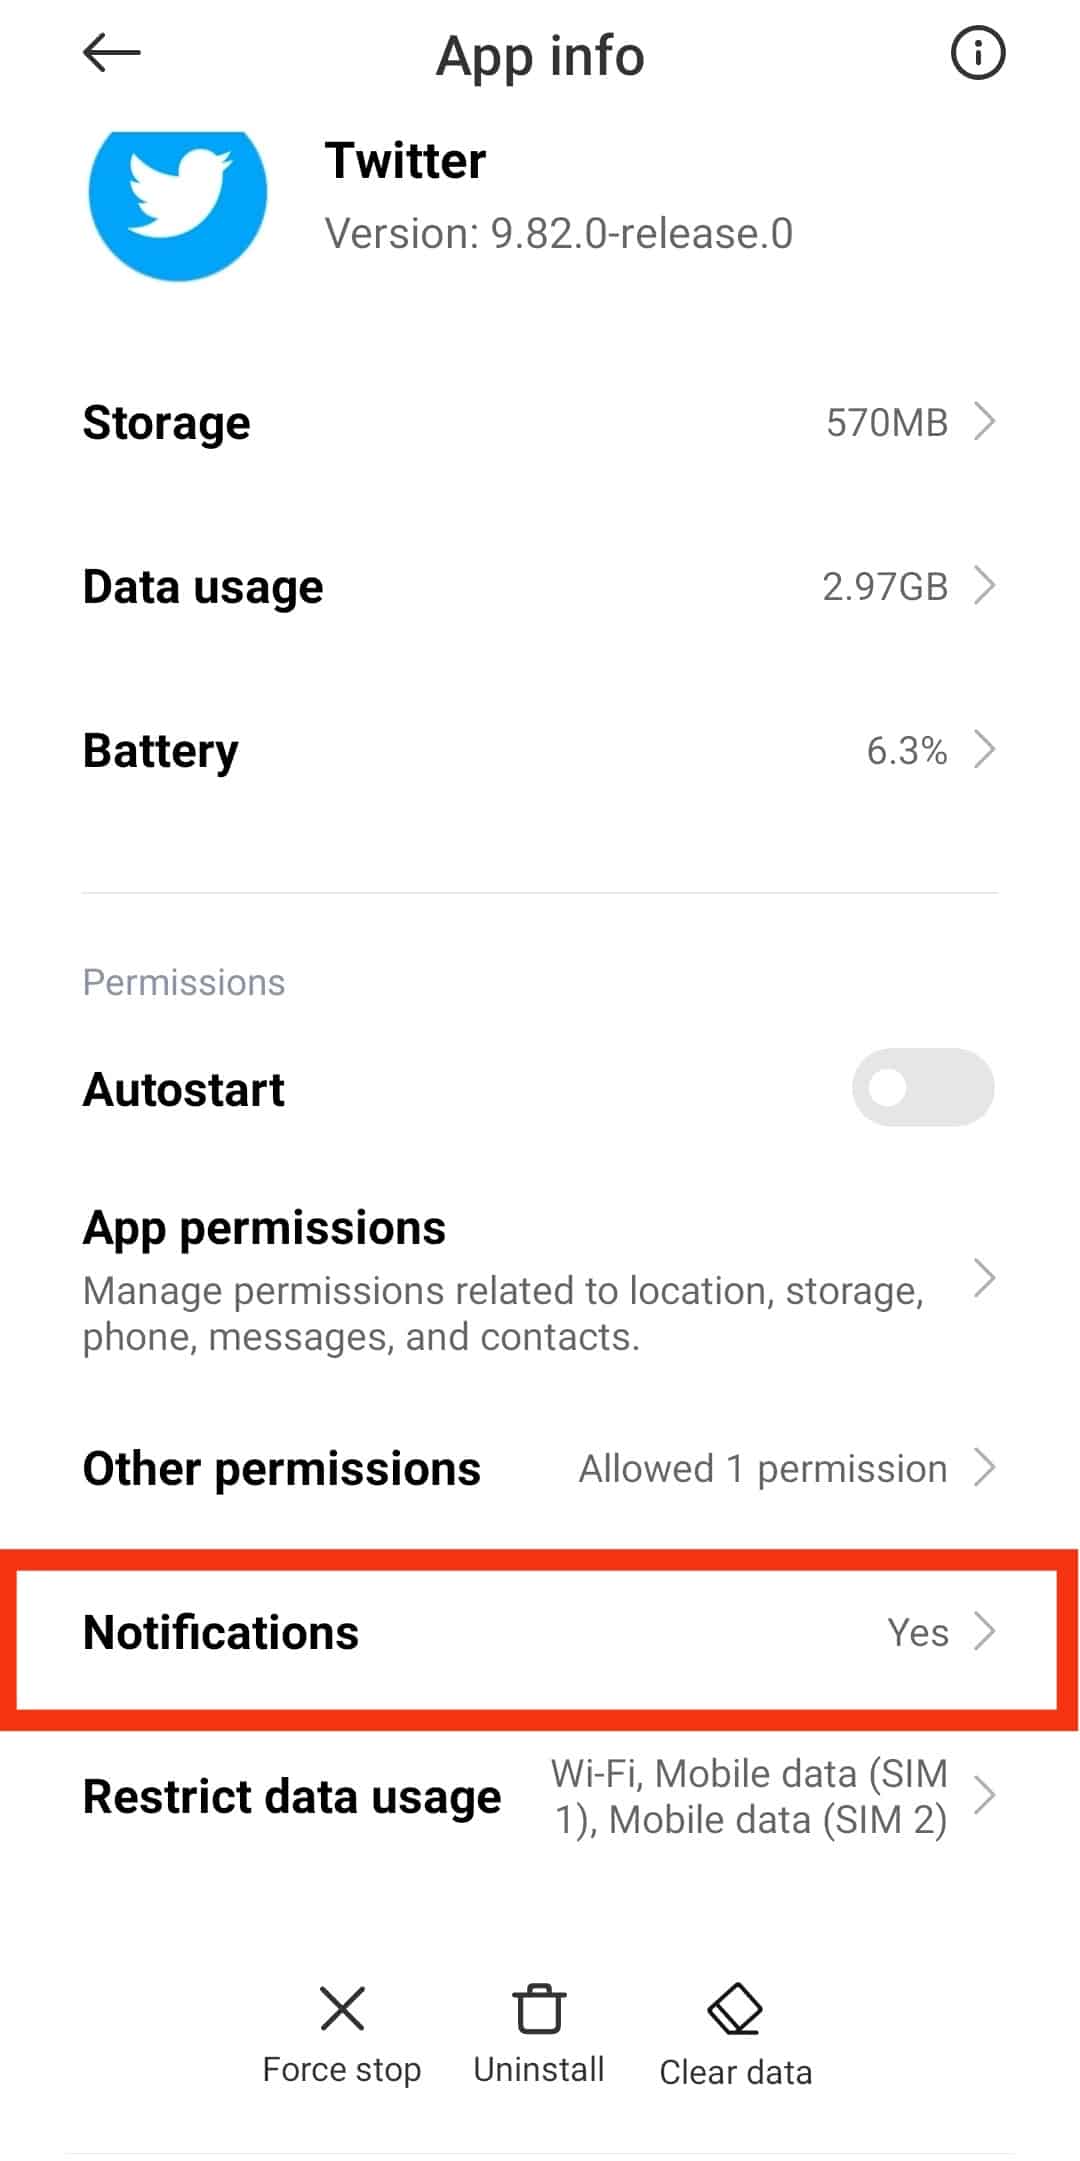
- Search or scroll to “Twitter” and tap on it.
- Select “Notifications.”
- Go to notifications and toggle on the notifications you’d like to receive by tapping on them one by one.
On iOS devices
Follow these steps:
- Go to your phone’s Settings.
- Scroll down and tap on the “Twitter” or “X” option.
- Select “Notifications.”
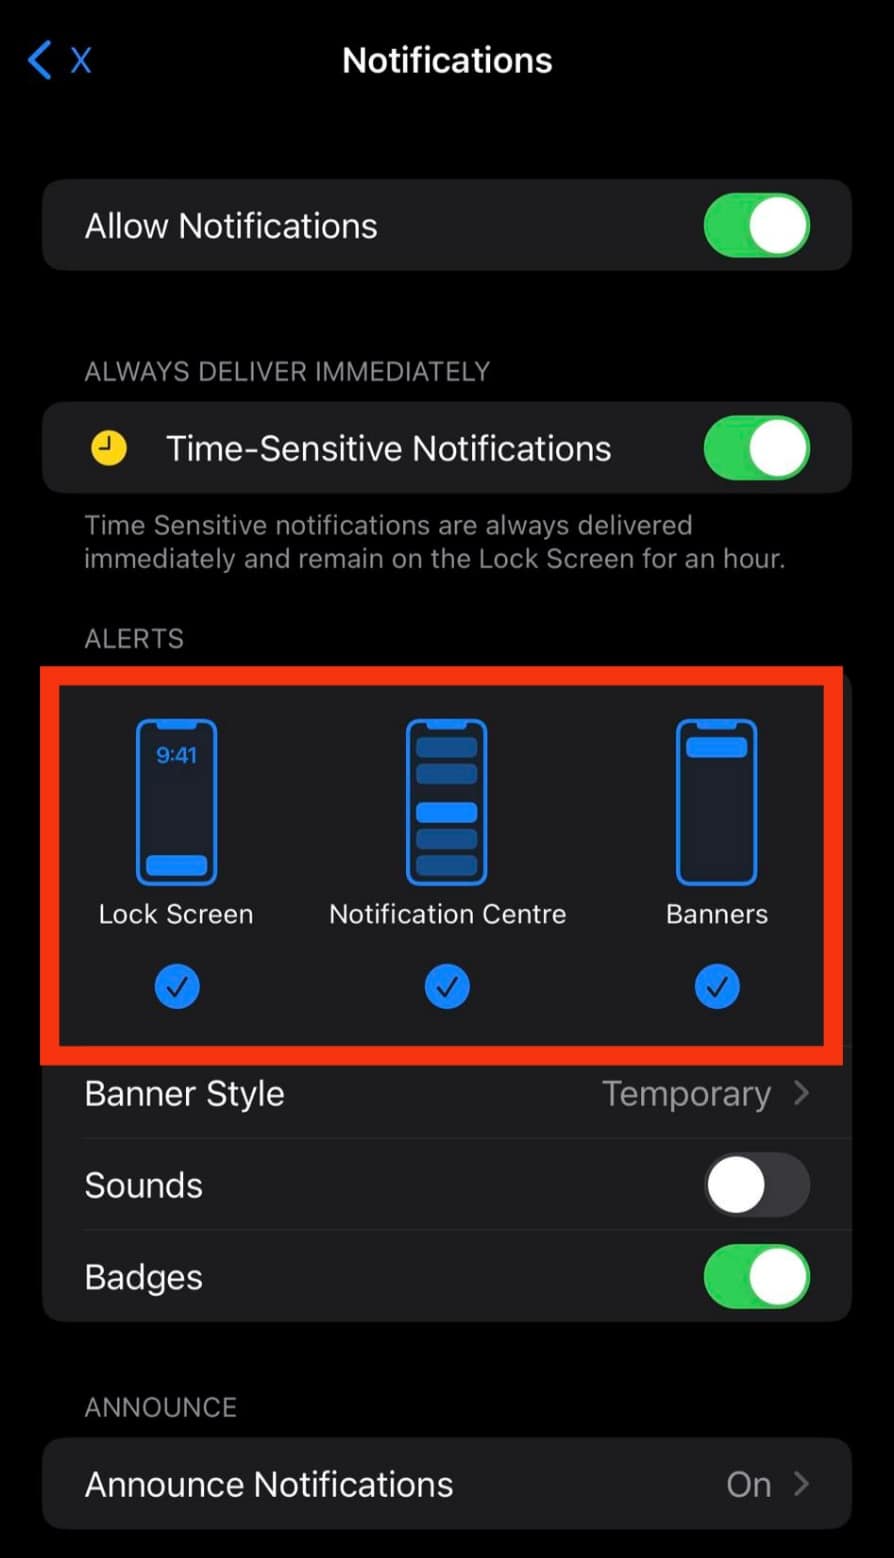
- Turn the “Allow Notifications” toggle on.
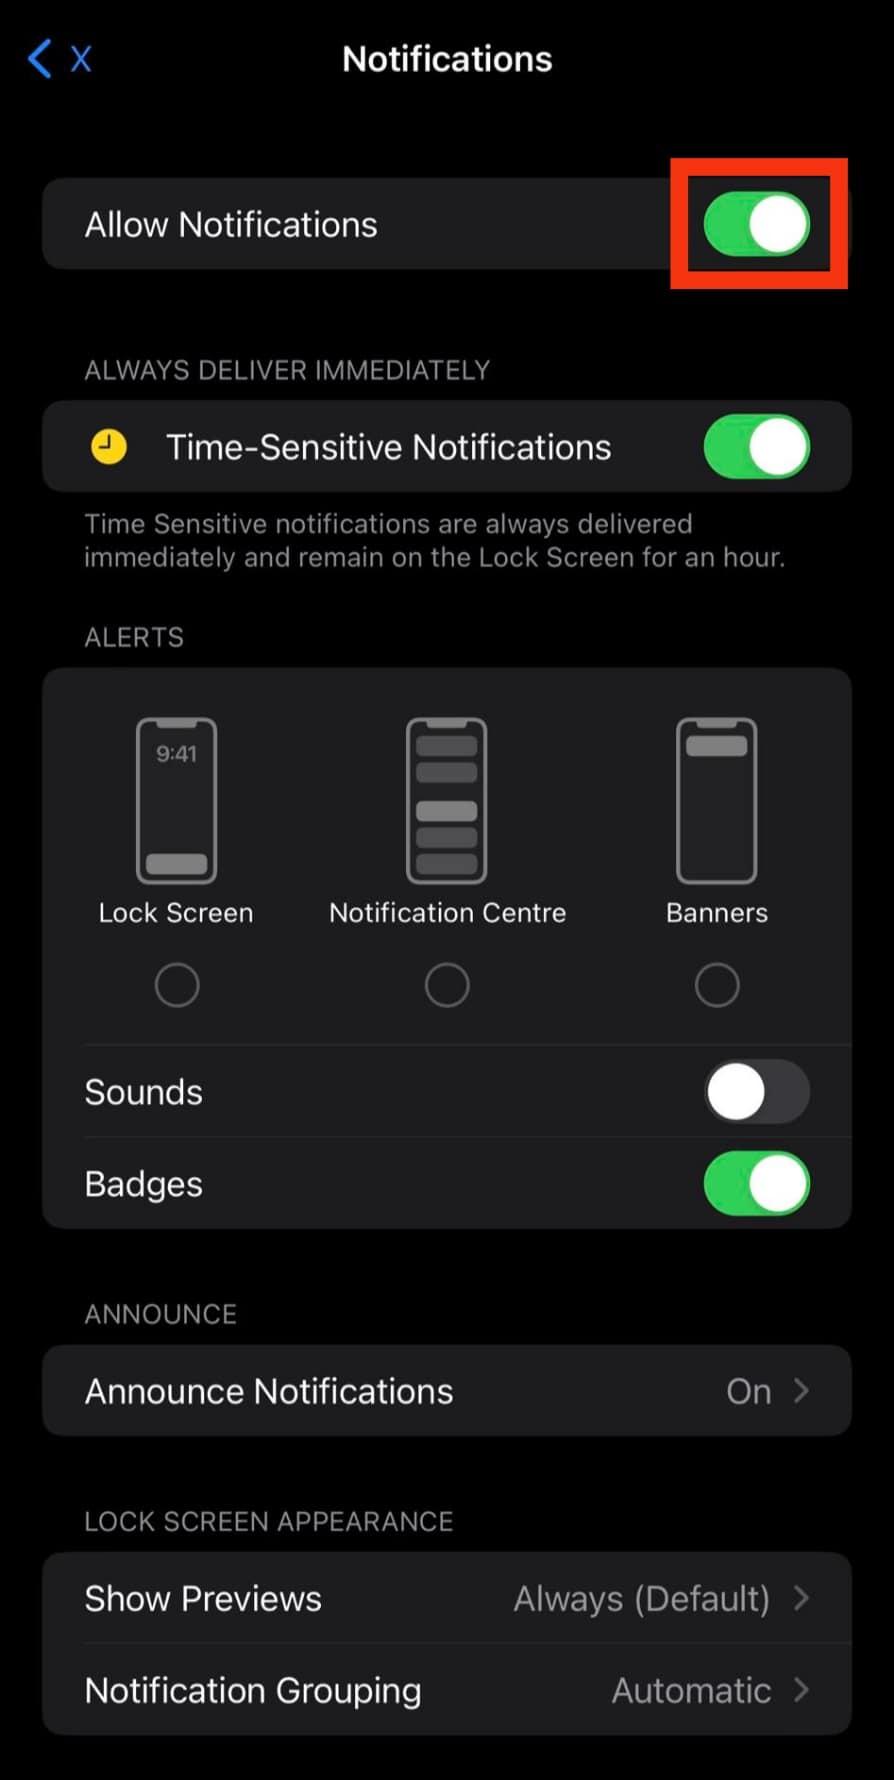
- Also, go to the “Alerts” section. Select all the options (“Lock Screen,” “Notifications,” and “Banners“).
Reason #3: Your Twitter App Is Outdated
An outdated app limits the app’s functionality. There is a high chance you’re not getting Twitter notifications because you’re using an outdated Twitter app.
Update the app from the play store (Android devices) or app store (iOS devices).
Reason #4: Internet Connection
Twitter functionality relies on your internet connection. So you can restart your internet if the problem is due to a weak internet connection.
Reason #5: Too Much Cache
Has it been ages since you deleted your Twitter Cache? You may need to delete it. To delete the cache on Twitter, follow these steps:
- Launch the Twitter app on your iphone.
- Tap the profile picture in the top left corner.
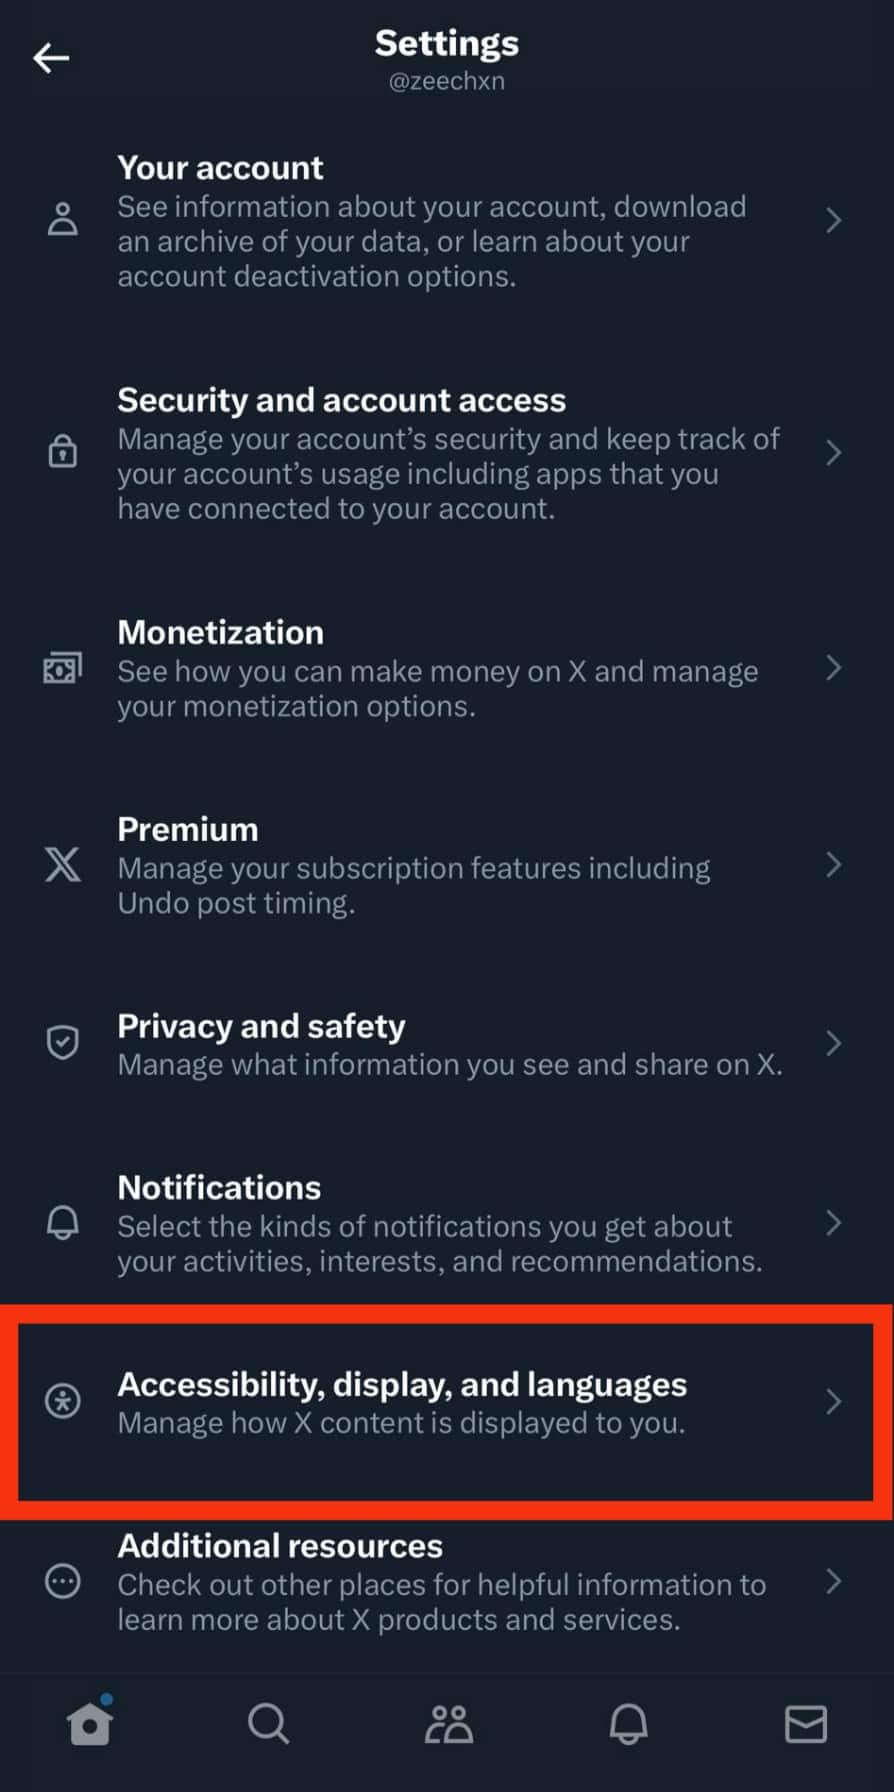
- Navigate to “Settings and privacy.”
- Go to “Accessibility, display, and languages.”
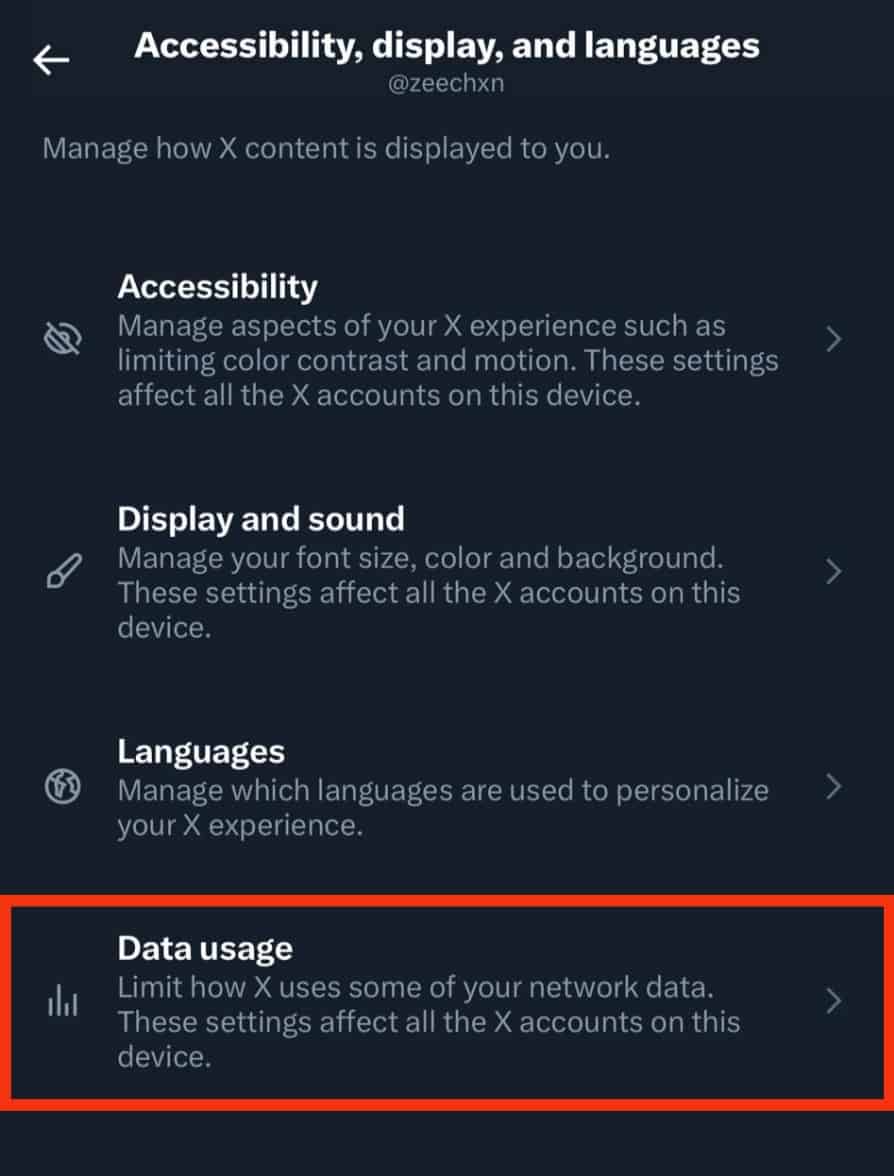
- Tap the “Data usage” option.
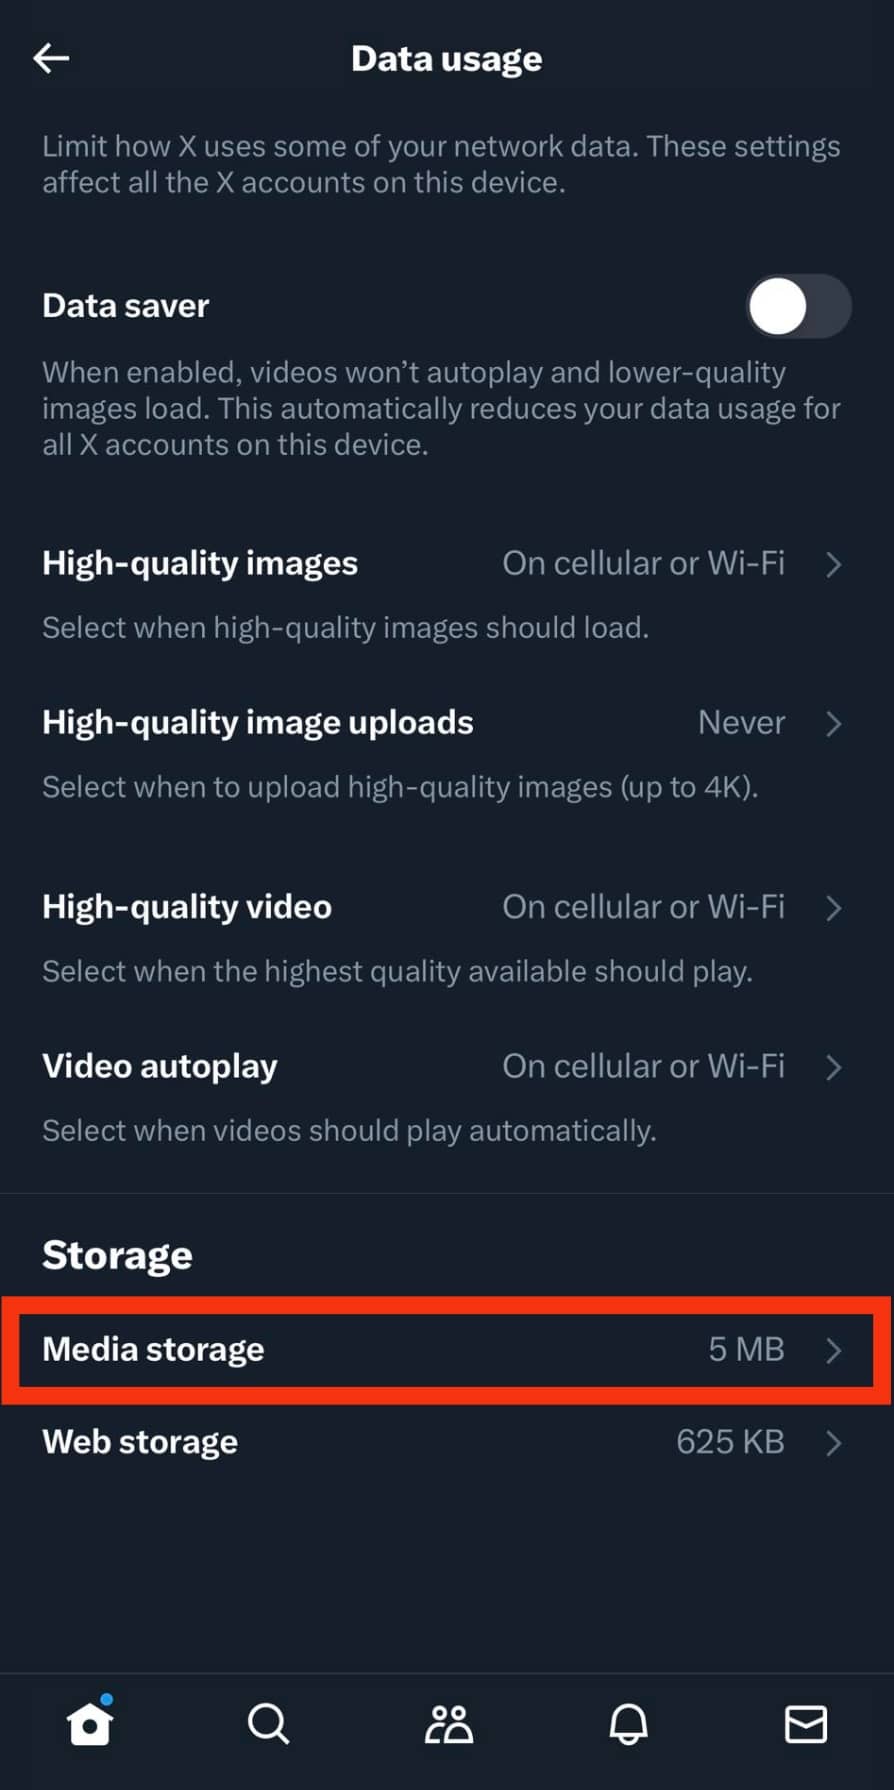
- Tap “Media storage.”
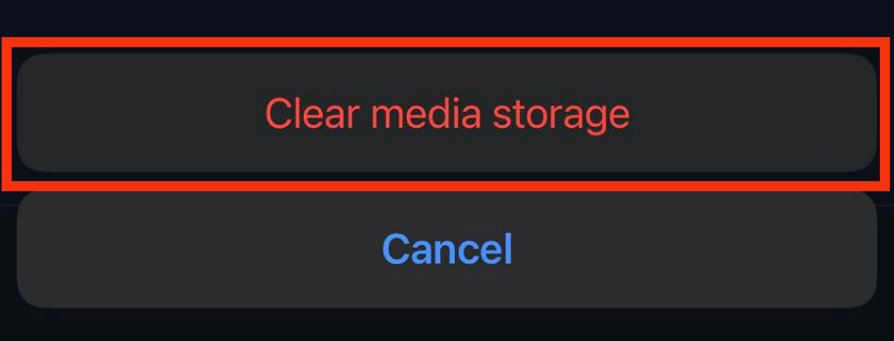
- Tap “Clear media storage” to clear media storage.

- Confirm by tapping “Clear media storage” again.
- Go back and tap the “Web storage” option.
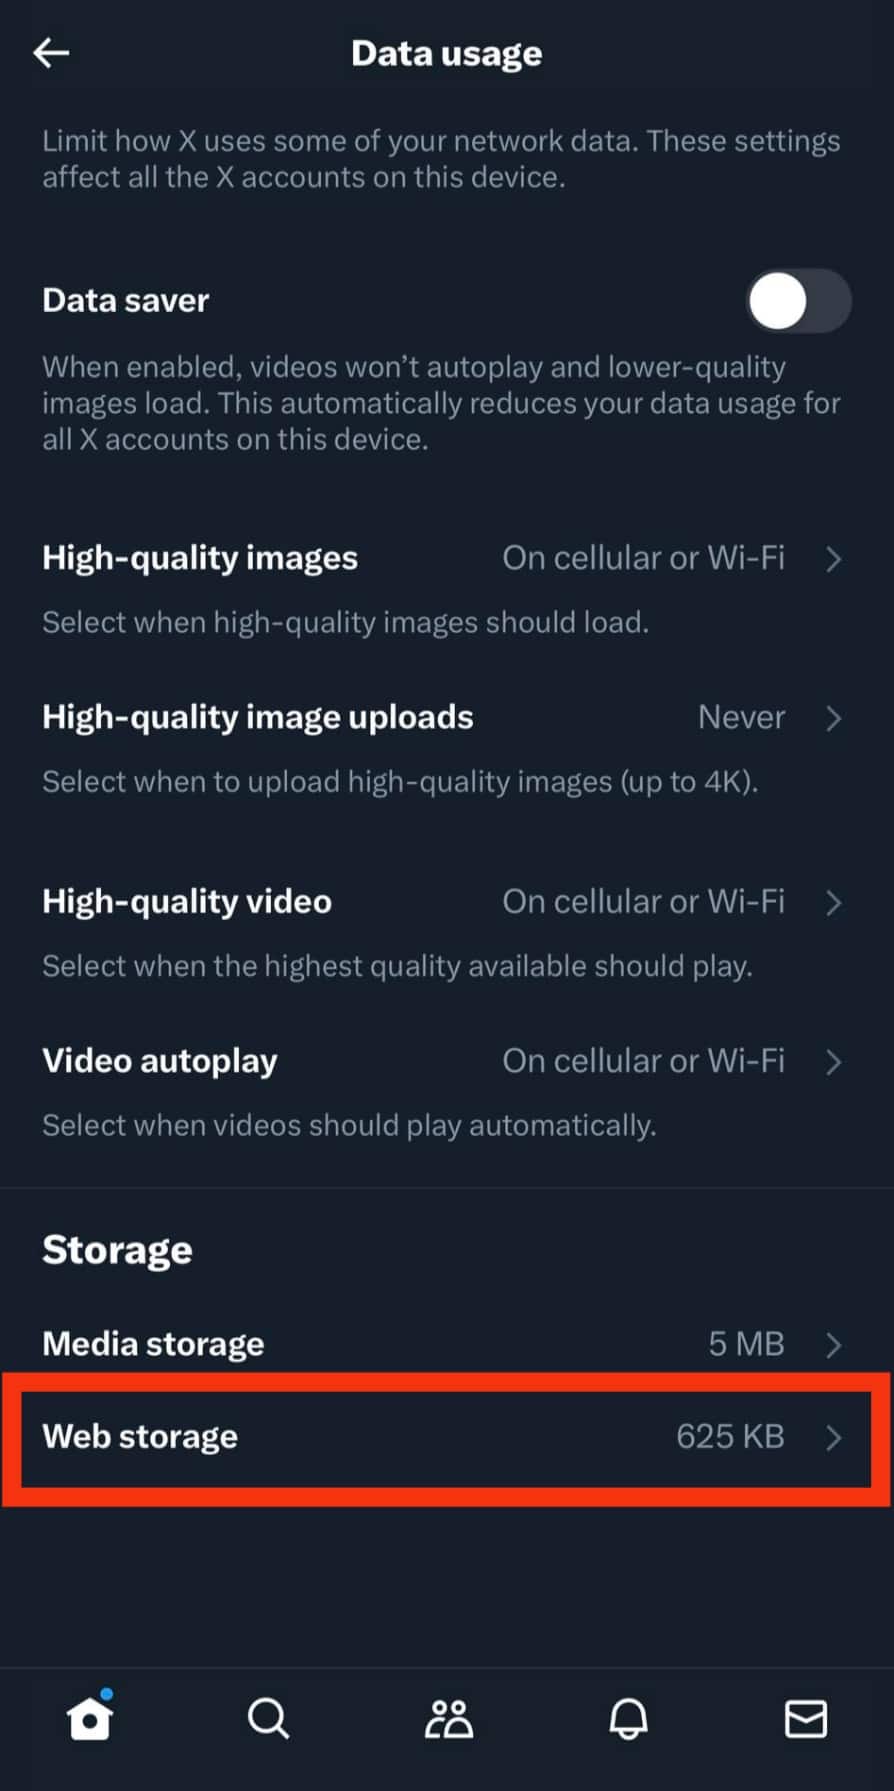
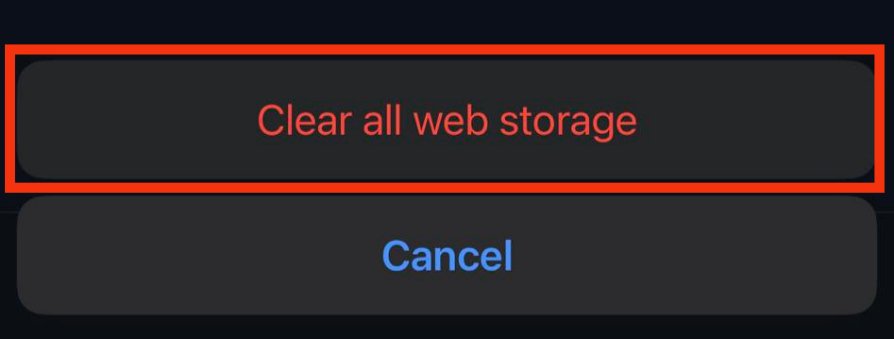
- Tap “Clear all web storage” to clear the cache stored on the web.
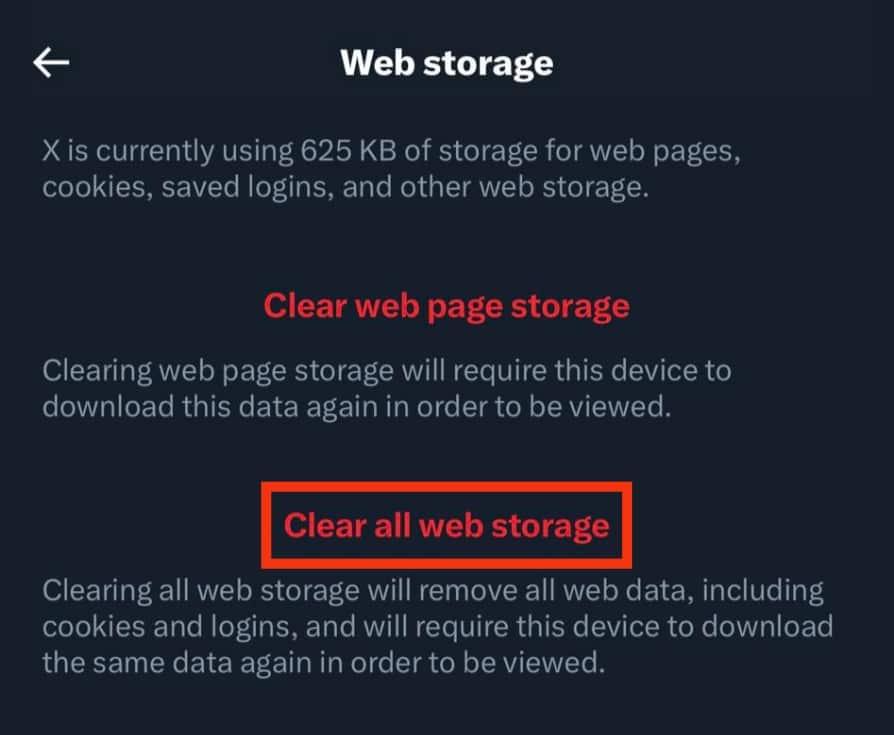
- Tap “Clear all web storage” to confirm the action.
Wrapping Things Up
Changing and customizing Twitter notification sound on an Android device is easy.
You can do it directly from your phone’s settings.
And with that, you’ll hear your favorite tune whenever a Twitter notification pops up on your phone.
However, there is no way to separately change the Twitter notification sounds on newer iPhones.