Instagram can be addictive, right? However, you can only enjoy the platform till you get a “Couldn’t refresh feed” error popping up on your screen. Have you been affected by this problem before? This error affects a significant number of users. The error often comes accompanied by a failure to refresh the general feed or loading videos and photos, thereby denying you access to reels, stories, and other posts.
What causes the famous “ Couldn’t refresh feed” error? This problem comes about due to a slow internet connection, an outdated application, incorrect date and time, and many more depending on the application, network, and device used.
In this article, I prepared a list of the possible causes of the error, including how to fix them individually. Therefore, what causes the “Couldn’t refresh feed” error? Let’s have a detailed look.
Causes of “Couldn’t Refresh Feed” Error
Slow Internet Connection
We must all agree on this. To use Instagram, you need a strong and reliable internet connection. For this, the “Couldn’t refresh feed” error often pops up due to the poor and choppy internet signals.
Public Wi-Fi networks, for example, often experience lots of data traffic and overload because of many users accessing the network, often resulting to slow internet for the users, making it insufficient to support the internet speeds needed by Instagram. Therefore, as a remedy, you need to switch to a better network for a better service.
Unresponsive App
You could also be having an unresponsive application, leading to the famous error popping up. There are two ways to approach the problem in such a case; you can either re-login or force stop the application.
To re-login;
- Open the Instagram application.
- Navigate to the profile tab.

- Tap on the three bars in the top right corner of the screen.
- Select “Settings.”
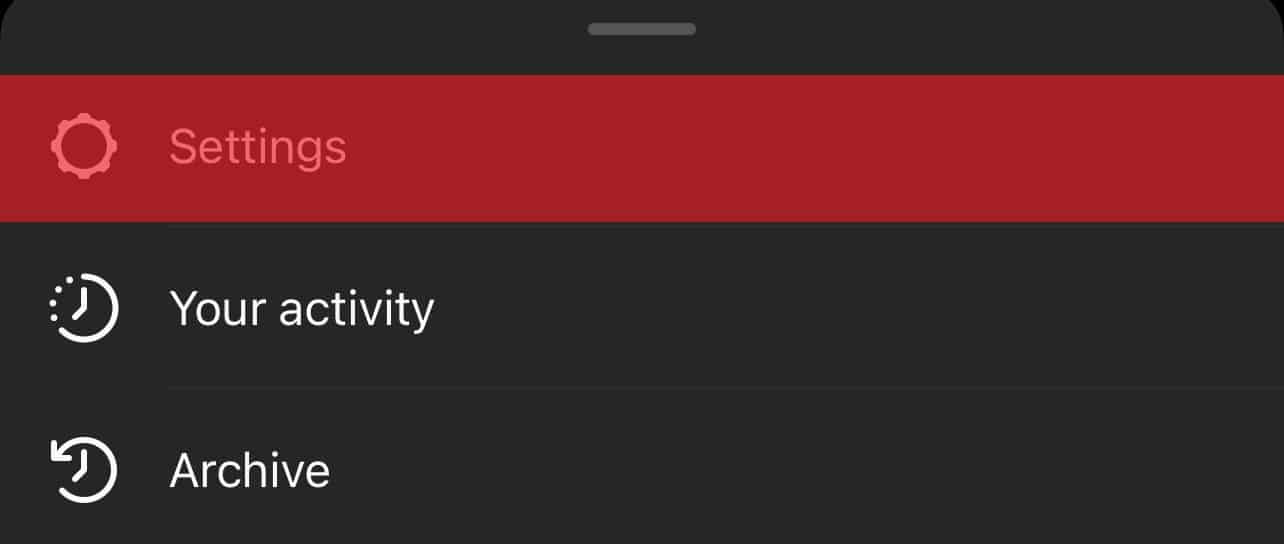
- Tap on the log out button, then log in again.

If re-logging fails to solve the problem, you can force stop the application. Force stopping ends all tasks related to Instagram in the background and refreshes the feed as soon as you reopen the app.
Use of Third-Party Applications
Instagram will automatically block you from accessing the site’s services and give you the “Couldn’t refresh feed” if you use automation tools or third-party applications to boost your engagement, such as liking, commenting, and following posts and people.
Although Instagram allows the use of some bots, such as scheduling bots, they are minimal to reduce the engagement of bots on the platform. There is a strict policy against automated bots and third-party apps, and failure to adhere will automatically have your account denied service or, even worse, banned.
Avoid unauthorized bots, and you will rarely see the pop-up error. If the error is persistent even after clearing the bots, try using another device.
App Out of Date
The “Couldn’t refresh feed” error popping on your screen might be because you are using older versions of the Instagram application. However, to safely and comfortably access all the features in the platform, your application needs regular updates from either the App Store or the Play Store.
How do you update your application?
- Open the App/Play Store and search for Instagram.
- Tap on “Update” and let it download and auto-install.
- Re-launch the application.
Corrupt Cache and Full Storage
Every application you use collects cache from your browsing history for a better browsing experience the next time you use the app. However, having a corrupted cache memory and storage might lead to glitches and inconveniences such as a pop-up of the “Couldn’t refresh feed” error, preventing the app from loading recent feeds.
Therefore, if you see the error, you might want to consider clearing your app’s cache and storage history. If you are using an android phone, here’s how to do it;
- Long-press the Instagram icon on the home screen
- Click on the “Storage and Cache” bar on the subsequent menu.
- Select “clear cache and storage.”
Your feed will start loading as soon as you relaunch the application.
Incorrect Date and Time
Who knows, your device’s date and time might be incorrect. Instagram synchronizes its dates to the device’s date and time to create harmony in the time zones for a smooth feed. However, suppose your device’s date is incorrect; the imbalance will cause an inconvenience in loading the feed, such as stories failing to load and occasionally popping up the “Couldn’t refresh feed” error.
If you have such an error, what should you do?
- Locate and click on the “Settings” icon on your device’s home screen.
- Scroll down to date and time settings.
- Set the time to the correct values.
To be safe from repeating the process, you can activate the automatic date and time so that your device automatically syncs its time to your time zone as provided by the network.
Instagram Servers Might be Down
Although this is one of the most unlikely reasons, Instagram servers being out of service significantly contributes to the “Couldn’t refresh feed” error. The inconvenience might be due to significant traffic from the numerous platform users simultaneously trying to access the site, or the servers could be temporarily out of service for reasons such as maintenance.
To be sure of such problems, you can use monitoring apps like down-detector and internet speed-test to investigate the traffic issues or check with other platforms like Twitter to see if there are any complaints about the lack of service.
Unfortunately, you will have to be patient with such errors and wait till the problem is resolved.
Conclusion
The “Couldn’t refresh feed” error is unpredictable and can affect anyone using the Instagram platform. However, you need to be wary of the possible causes of the problem and know how to avoid them.
I hope this article has enlightened you on the possible causes of the problem and how to fix it.