There may be some instances where you may have a network attached to your local segment and you to provide the ability for some computers on that segment to route traffic into that network. Using the Windows ROUTE command, you can easily control the flow of traffic leaving your computers. Here is an example of a subnet that has two routers plugged into the segment.
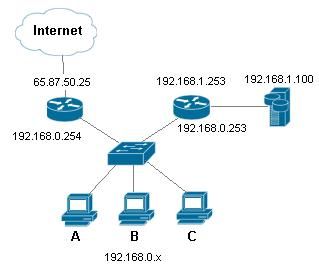
Computers normally have only one default gateway. So which router interface would you configure as your gateway for computers A, B, or C? Generally, your default gateway is the interface that packets are sent to when no other routes to the destination are known.
In this case, it would be 192.168.0.254. Unlike traditional routers, computers generally do not have large routing tables. Wait, computers have a routing table? Yes, all computers running TCP/IP have a local routing table.
The routing table is used by TCP/IP to make decisions on whether to send the packet to a computer on the same segment or to forward it to the default gateway.
So in this example, if you wanted to access a host in the 192.168.1.x segment, your computer would send it to the default gateway because your computer doesn’t have any information about that subnet. Since the direct route to this network is not known, your computer sends the packet to the gateway (router interface 192.168.0.254).
If your router doesn’t have any information about this network, your router will either discard the packet or send it to its default gateway. The packet will continue along the chain of routers until its delivered or discarded.
If we add a route for 192.168.1.0 in our computer’s local routing table, we will be able to send the traffic to the 192.168.0.253 interface. Once that router receives the packet, it will send it to the destination since that network is locally attached to the router.
Here is an example command to add an additional route to our local routing table.
route ADD 192.168.1.0 MASK 255.255.255.0 192.168.0.253We are instructing the computer to add a route to the 192.168.1.0/24 subnet by sending the packet to the 192.168.0.253 interface.
If you want to look at the routing table, use the following command:
route PRINTHere is an example of the routing table after the route has been added.
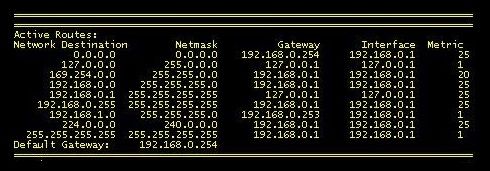
Now, from this point on, you will be able to access all hosts in the 192.168.1.0 subnet from the 192.168.0.0 subnet that has this information in the local routing table. For specific route parameters on each Windows OS, just type route /? at the command prompt.