There may be instances that you may see the old DHCP servers still listed when you view DHCP Authorized servers using the DHCP Admin console. While this should not cause any issues for existing DHCP servers that are currently in production, you will want to clean up the directory.
You can view your Authorized DHCP Servers via the DHCP Admin console, via the NETSH command, or by using ADSIEdit. Use one of the following methods:
Using the DHCP Admin Console
Launch the DHCP Admin console. You should have the admin console listed in your Administrative tools if you have Adminpak or RSAT tools installed on your computer. Once you have the admin console open, right click the DHCP object and click on Manage Authorized Servers.
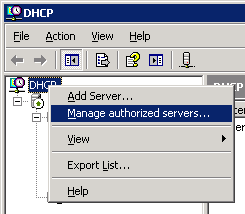
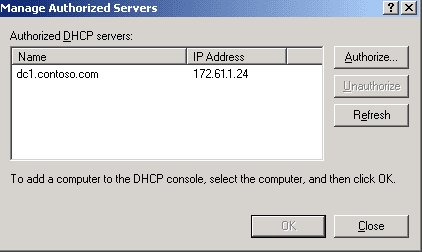
Click on the server you want to unauthorize and click the Unauthorize button.
Netsh
You can view and delete authorized servers using the netsh command. The command to show authorized DHCP servers in the directory is as follows: netsh dhcp show servers. The results are as follows:
Microsoft Windows [Version 6.1.7601]
Copyright (c) 2009 Microsoft Corporation. All rights reserved.

C:\Users\dhcpAdmin>netsh dhcp show server

1 Server was found in the directory service:

   Server [dc1.contoso.com] Address [172.61.1.24] Ds location: cn=dc1.contoso.com

Command completed successfully.

C:\Users\dhcpAdmin>
To delete and unathorize the server, run the following command: Netsh DHCP delete server ServerFQDN ServerIPaddress
Netsh DHCP delete server dc1.contoso.com 172.61.1.24ADSIEdit
If you use the ADSI Edit snap-in, and you incorrectly modify the attributes of Active Directory objects, you can cause serious problems. Modify these attributes at your own risk.
- Click Start, point to Programs, point to Administrative Tools, and then click Active Directory Sites and Services.
- Click Services, and then click Net Services. If you cannot see Services, click to select Show Services Node on the View menu.
- In the right pane, right-click the name of the DHCP servers that you cannot add to Active Directory, and then click Delete.
- When the “Are you sure you want to delete this object?” message appears, click Yes.
- Force replication of Active Directory to the other sites, or wait for the replication cycle to be completed.
- Click Start, click Run, type
Adsiedit.mscin the Open box, and then click OK. - Expand Configuration, expand
CN=Configuration, expandCN=Services, and then clickCN=NetServices. - Right-click
CN=DHCPRoot, and then click Properties. - In the Select a property to view list, click DHCPServers.
- In the Values list, click the name of the new DHCP server, click Remove, and then click OK.
- Click
CN=NetServices, right-click the entry for the new DHCP server, and then click Delete. - Force replication of Active Directory to the other sites, or wait for the replication cycle to be completed.