A Loopback adapter is a testing tool for a virtual network environment where network access is not available. This may come in very handy when you need to test or verify network connectivity.
The easiest way to add a Loopback Adapter is to add it virtually using the Windows OS. The following steps describe how to add a Microsoft Loopback Adapter. However, if you need an actual physical Loopback Adapter, you can either purchase one or simply create one on your own.
Install Microsoft Loopback Adapter (varies depending on the Windows OS)
- In the host operating system, right-click My Computer, and then select Properties or use the Control Panel.
- In the System Properties dialog box, on the Hardware tab, click Add Hardware Wizard.
- In the Add Hardware dialog box, click Next.
- “When the Is the hardware connected?” dialog box appears, click Yes, I have already connected the hardware, and then click Next.
- In the Installed hardware list, click Add a new hardware device, and then click Next.
- In the “What do you want the wizard to do?” list, click Install the hardware that I manually select from a list (Advanced), and then click Next.
- In the Common hardware types list, click Network adapters, and then click Next.
- In the Manufacturer list, click Microsoft.
- In the Network Adapter list, click Microsoft Loopback Adapter, and then click Next twice.
- If a message about driver signing appears, click Continue Anyway.
- In the Completing the Add Hardware Wizard dialog box, click Finish, and then click OK.
After you install the adapter, it will appear in the Network Connections folder as a new NIC, such as Local Area Connection 2 (or the next available number).
You should probably rename this adapter to “Loopback” so it is easy to identify. You will need to assign an IP address and other TCP properties, just as you would for any other interface.
Create Your Own Physical Loopback Adapter
If you do not want to add a virtual Microsoft Loopback Adapter, or cannot because you need it for a router, switch, or other networked device, you can always plug in a physical Loopback Adapter into the ethernet network adapter.
You can even build one yourself if you know how to work with RJ-45/CAT5 cable. It is basically creating a cross-over cable with just one plug. You will need a typical patch cable, RJ-45 plugs, a crimper, and some heat shrink tubing if you really want it to look professional.
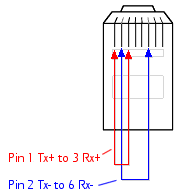
Wire 1 to 3 and 2 to 6. Crimp the plug and twist the ends of 1 & 3 and 2 & 6 and then use a 1″ section of heat shrink tubing to cover the exposed wire.